Automations
In the context of this Documentation “Valispace” will be called “Requirements and Systems Portal“ or in short “RSP“.
Introduction
As of today, most engineers would expect at least the changes made in projects to be up to date. The implemented modifications should be accessible by the team. In addition, RSP has introduced ‘Automations’ within the software that helps the user customise a rule that is automatically implemented at the user’s convenience.
The word “automation” itself is self-explanatory but to get into the details, most engineers want to create, update or delete the elements or trigger some actions automatically. Also, some engineers want to be notified each time when a change occurs. Engineers prefer to automatically run calculations to keep the project up to date and running in order. Automations in RSP are designed to fulfil the above requirements.
Flow chart of Automations
The image below shows the general steps and the possibilities to create automation. The user can create automation by defining the three i.e When, Trigger and Actions.
.png?inst-v=fd4a0fd8-56d5-48dc-b578-82615c205aa4)
Types of Automation
There are three possible types of automation in RSP.
Executed based on schedule or every X amount of time
Executed when data is created, updated, or deleted
Executed manually by a user or another automation
Basic steps for creating automation are shown in Figure Creating an Automation below. To open ‘Automations’, the user should go to the home button/project module (1) where ‘Automations’ is found under the “collaboration” section (2). To create an automation, the user has to click on the ‘+’ sign (3) on the lower right-hand side. Upon clicking, a pop-up window appears (4). In the pop-up window, the user should choose a name and click on ‘Create’. In the automation created, under ‘When’ the user can select the three possible types of automation, as given above and set any other properties for this automation (5).

Creating an Automation - Steps to follow to create an Automation.
In automation, there are three steps for a user to set up, as shown in the image below.
Name: The name that is chosen for the automation along with a description in which the user can describe the automation (1).
When: The user can choose the type of automation (2).
Trigger: The user chooses the objects, i.e. modules or requirements, or variables that shall change (3).
Actions: The user can choose the type of action that should be automated, such as sending notifications, changing values or running time sequences, etc. (4). The actions can be one or combined with multiple actions.
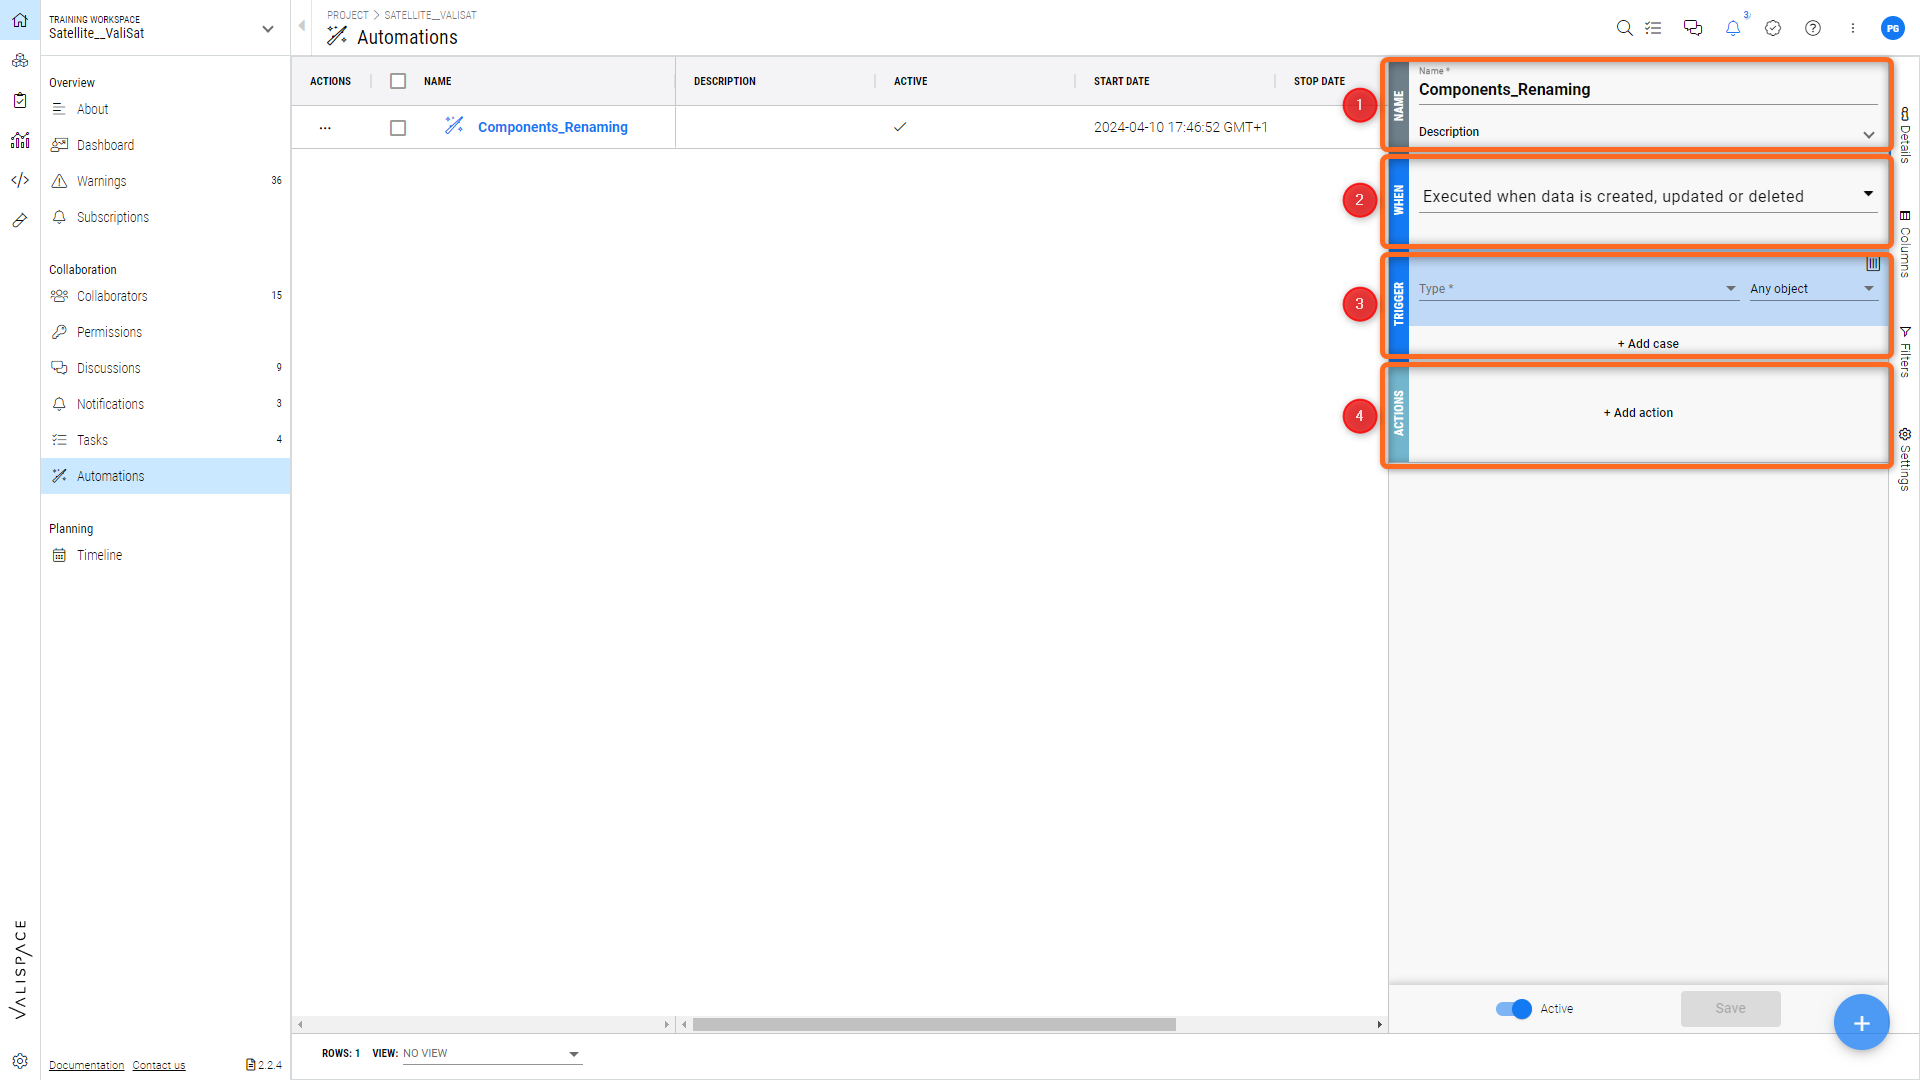
Setting up Automation - The 4 indicated steps are necessary to set up your custom automation.
Executed based on schedule or every X amount of time
The user can start automation at any given time/schedule or any number of times using this option.
In “executed based on schedule or every X amount of time”, there are two types:
Schedule: The user can use ‘Schedule’ to automatically add, remove or rewrite a file at a specified time. In this automation, the user can not only select data types such as Blocks, and Requirements but also the fields (name, description, ID, tags, and so on) to which the changes should be applied. All the present features and options are shown in the image below.
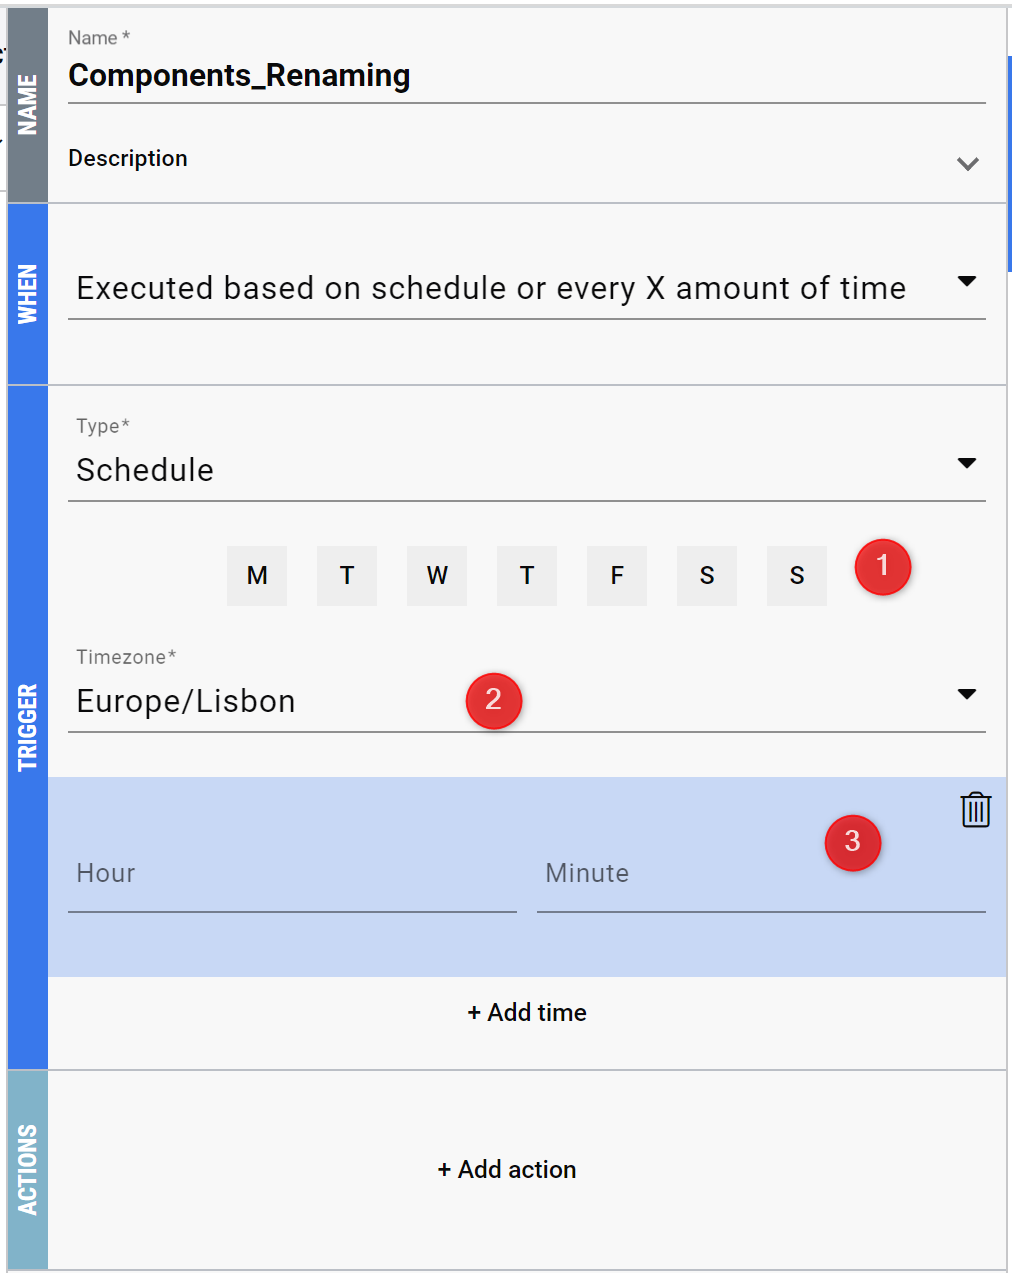
Setting up Schedule - Automations can be triggered on a Schedule.
In the above images, all the options present in the ‘Trigger’ are explained as follows:
Users can choose the day on which the automation should occur
Timezone - The user has to select the suitable timezone as per the current location
Hour, Minute - The exact hours and minutes the automation should take place are inserted based on 24-hour timings.
Figure Automation Example shows a small use-case to run a script based on a timeperiod. The script, ‘Battery_Capacity’ should be run on the day and time given by the user in the “TRIGGER” section. For this, in “ACTIONS”, the user shall choose “Run script” and select the script “Battery_Capacity”. Once the automation is saved, on every Thursday at 9:00 AM, the script is run automatically. If needed, the user can deactivate the automation by selecting “False” in the “Active” column.
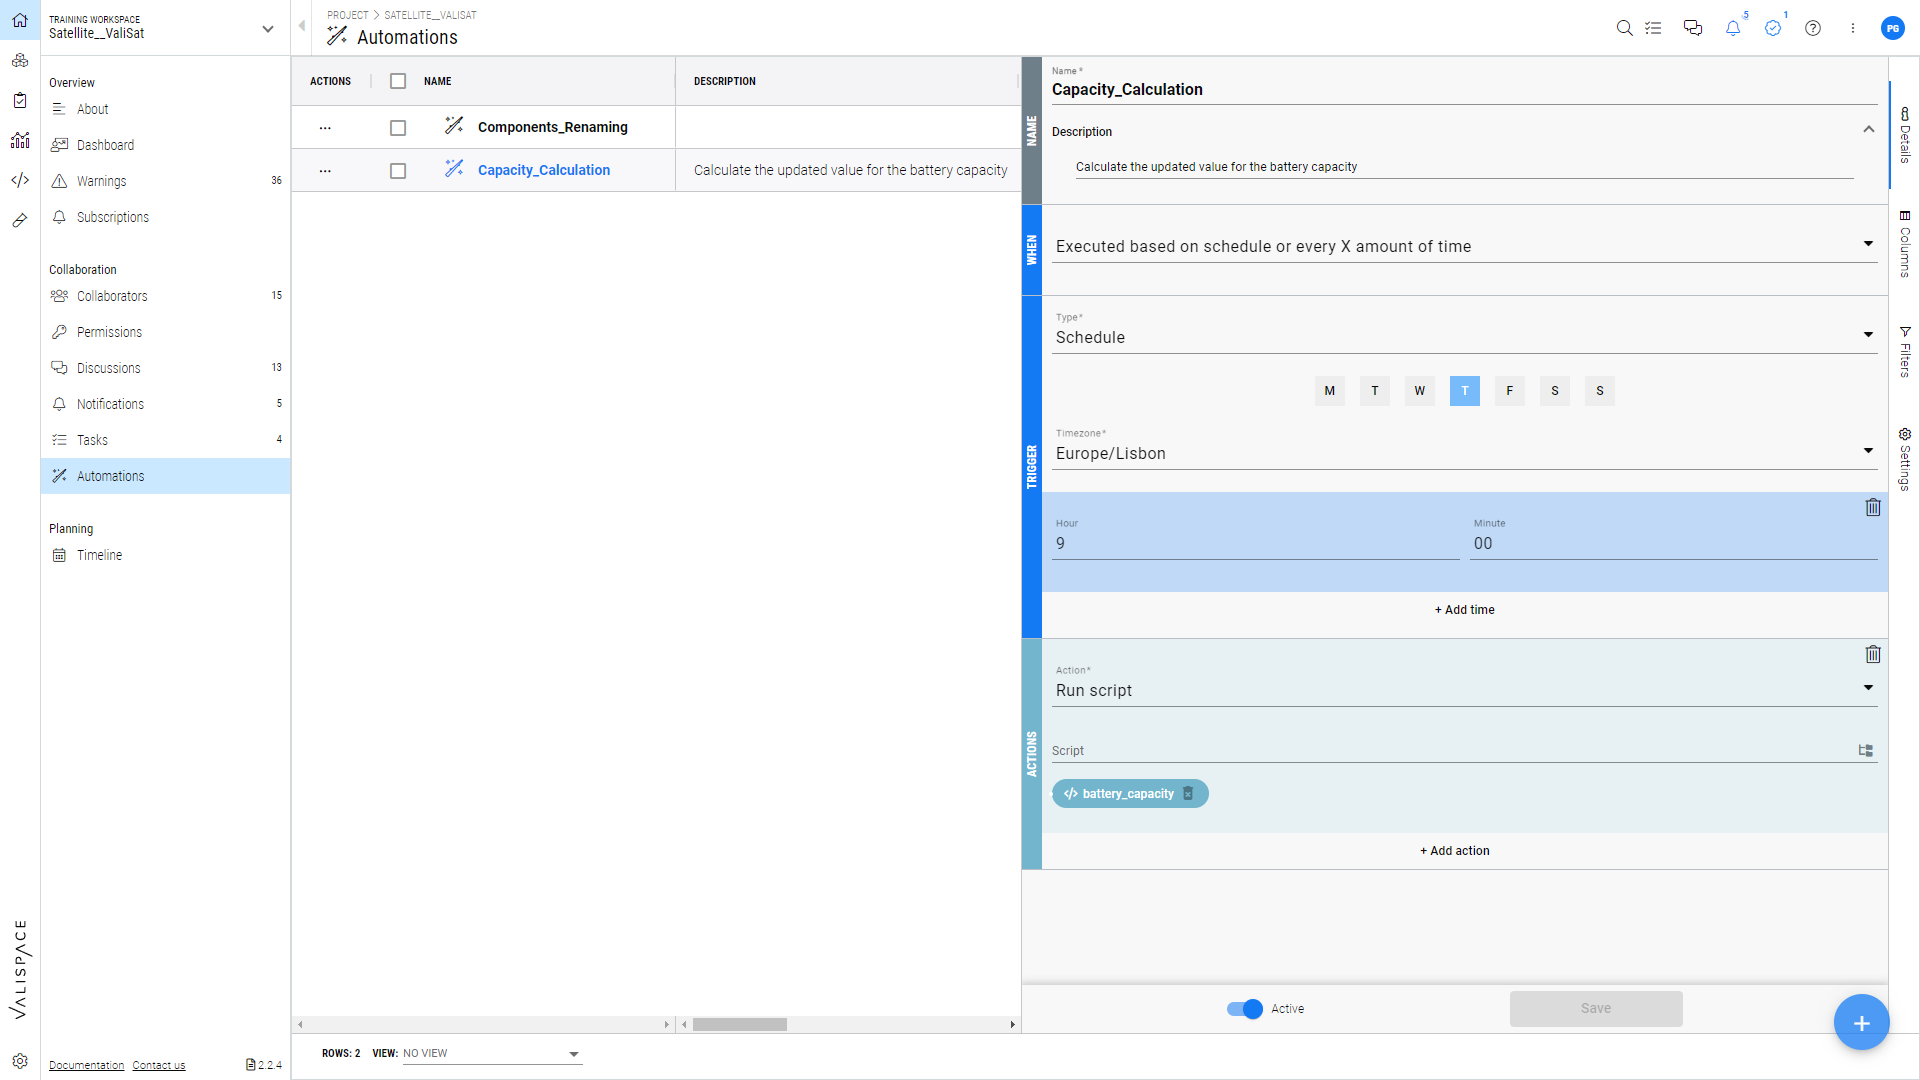
Automation Example - In this example a Battery_Capacity script stored in the Scripting Module will be run every Thursday at 9 am.
Periodical: This is time-based automation where the user can set a specific time and date at which a change/action should occur. The user can select a particular date and time to run automation, select X amount of time to run automation, send notifications to the users via email or notification message, Copy, copy and connect or copy and follow requirements and Blocks, change attribute values, activate or deactivate automation, run a time sequence or a script.

Periodical Automation
In the above image, the set-up features are shown for Periodical type (1), and in ‘run every’ (2), the user can choose between days, hours, or minutes for which the automation should run. It loops the automation based on the time selected.
Suppose the elements or files should be updated every week, the user can run the automation every once a week automatically using ‘executed based on schedule or every X amount of time’.
Executed when data is created, updated, or deleted
In this type of automation, the user gets notified each time a data type is created, updated, or deleted. The user also has an option to select specific objects to keep track of.
There are three methods through which the user can get notified
Notifications: The user gets notified with a message within the software at the notification bar represented as a bell icon.
Email: The user gets notified with an email that is given in the automation. The user can add as many email IDs as they wish to keep the team updated whenever a change occurs.
Notification and Email: If the user wants to get notified through email and notifications within the software, the user can use this option.
Other features within ‘executed when data is created, updated, or deleted’ are explained below:
Type: The user can select the type of elements such as Blocks, valis, and requirements (1)
Any object/Specific object: The user has the choice to keep track of specific objects or in general any object (2)
Action: The user gets notified each time any data type is created, updated, or deleted. (3)

Automation when Data is Changed - An automation can be run when data is created, updated or deleted.
Example
The gif below shows that the user is notified when a new Block is created. As shown in the gif, the user has selected the ‘type’ as Blocks and ‘Actions’ as ‘created’. In “ACTIONS”, the user selects the ‘Send notification and/or email’. In ‘type’, there are three notification types as mentioned above from which ‘Notification’ is selected and the users/groups are mentioned. In ‘Messages’, the user can type whatever has to be notified. Once the automation is saved and a new Block ‘Motor’ is created in the System Design module, a notification pops up on the bell icon. In the notification sidebar, the message ‘Created’ is seen when clicking on the bell icon.
If you need help setting up scripts and your own custom workflows with the help of Automations do not hesitate in contacting us, we are happy to help:
https://www.altium.com/support?_gl=1*darnhj*_ga*OTg3MjM1ODc3LjE2OTU2NDk5NDU.*_ga_1D91GHE4WS*MTcyOTYxMTc5OC41LjAuMTcyOTYxMTc5OC42MC4wLjA