Import Requirements
In the context of this documentation “Valispace“ will be called “Requirements and Systems Portal“.
Users can quickly and easily upload their existing requirements data into the Requirements and Systems Portal via the “Import” wizard inside the Requirements Module.
As illustrated in Figure Import Wizard Access, the Import wizard can be accessed from the top bar of the Requirements and Systems Portal, with its own action button (1) or where the table view would be on an empty Specification (2).
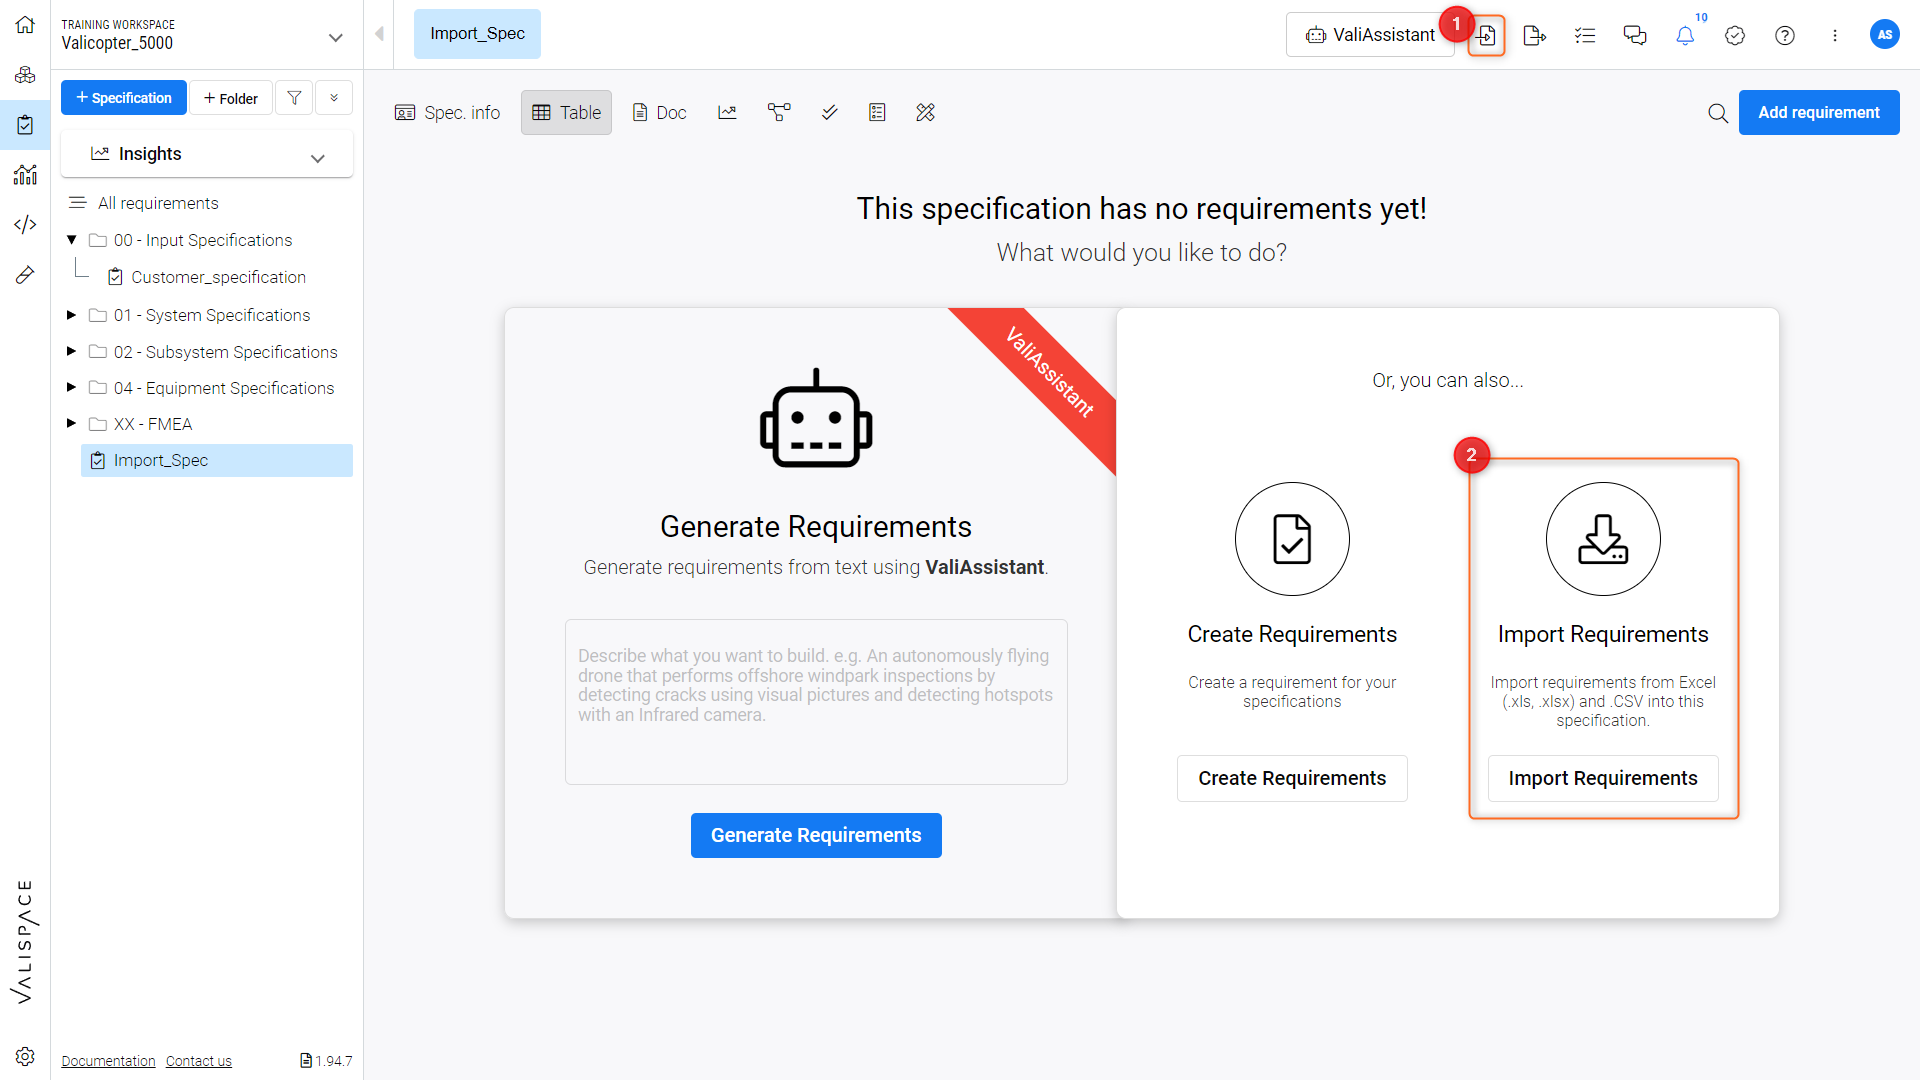
Import Wizard Access
This wizard guides users through three main stages: “Specification”, “Upload” and “Review” to import a Specification at a time. On completing a specification import, a summary is presented as well as the possibility to perform additional actions such as Valify or import other files.
These stages and actions are as follows:
1 - Selection
As seen in Figure Import Wizard Spec Selection, Users define the target import Specification, either a pre-existing specification (1) and its section (2) (optional) or they can create a new specification (3) (also being able to define the abbreviation (4) and the block (5) to be allocated to) without exiting the import wizard.
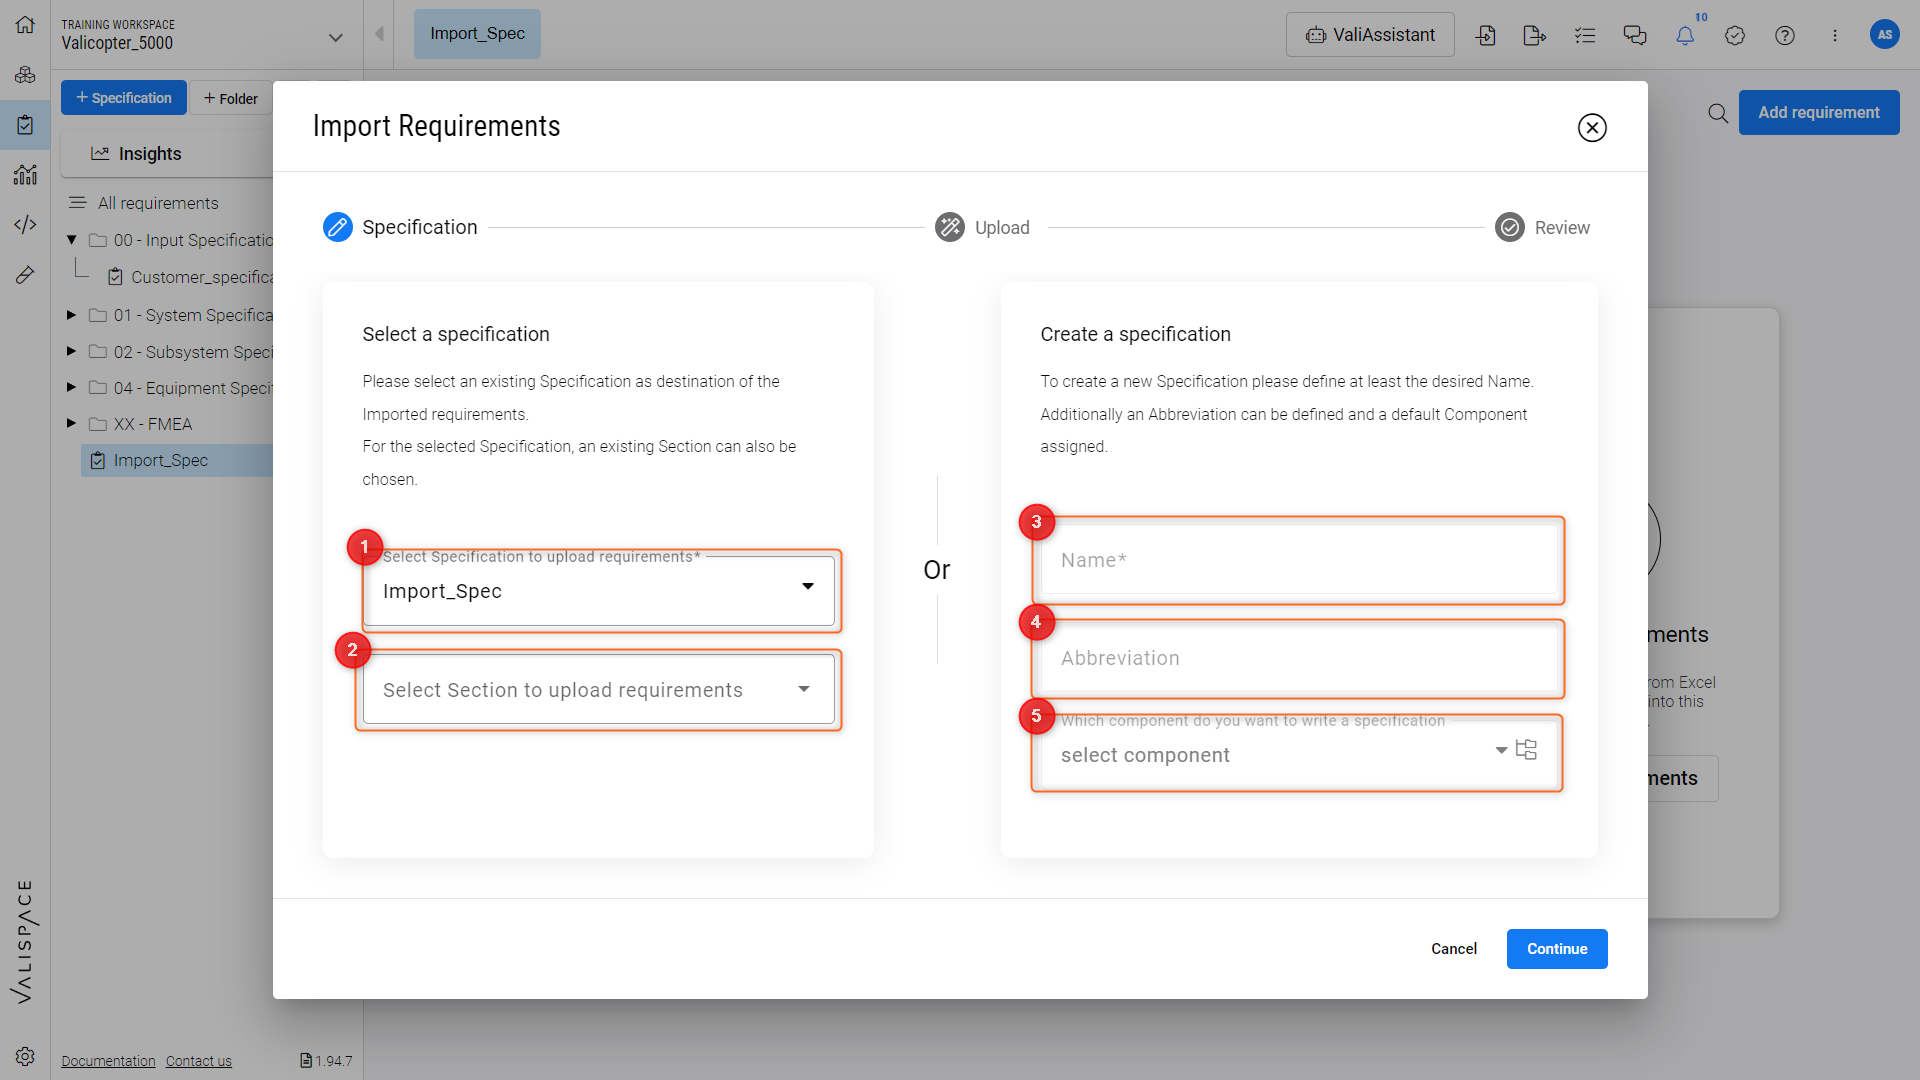
Import Wizard Spec Selection
If the Importer is started within the context of a Specification or a Section, that will appear as pre-select for import destination.
In case there are no existing specifications, the user must create one.
In the naming definition of the new Specification, users must abide by the naming definition rules, i.e., only alpha-numerical characters and the special characters “_” (underscore) are allowed.
2 - Upload
If one of the supported file types is uploaded, the user will be notified of the upload success and can either continue the import operation or upload a new file (replacing the previous one), as in the Video Uploading an Import File, where a file is dragged from a user’s desktop environment onto the wizard’s file upload area. In case a non-supported file is uploaded, an error message will notify the user.
Uploading an Import File
Only Excel (.xls, .xlsx) and .CSV files are currently supported. Excel Macro files (.xlsm) are not supported.
3 - Review
As seen in Figure Wizard Review, notification messages (1) will pop up at the top of the wizard to warn of any mandatory missing fields.
A user has also access to a visual indication of the “Destination” where their data will be imported to (i.e. Specification and Section), and has a set of “File options” to be selected (2).
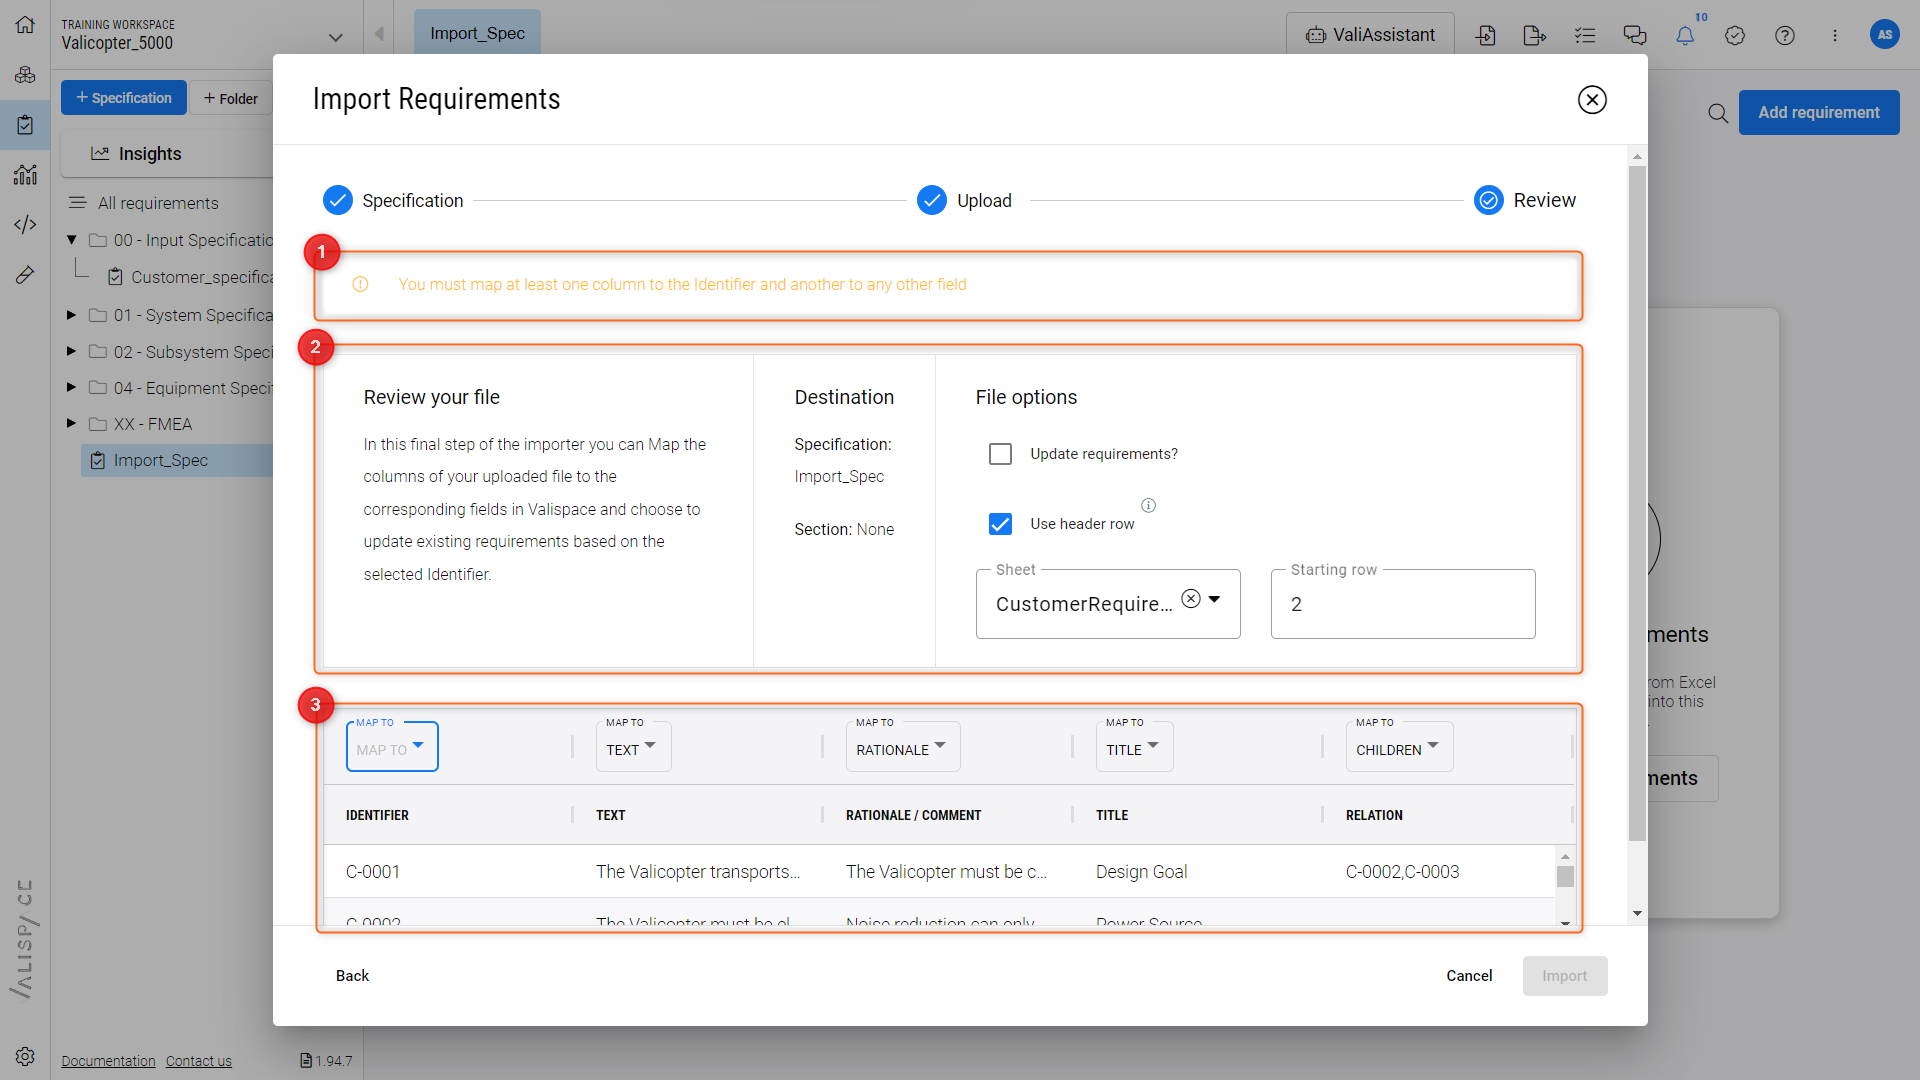
Wizard Review
In “File options” (2), the user can :
“Update requirements” selection - This overwrites any existent requirements in the destination specification by substitution of the data (file data substitutes the data in the specification).
In case the “update requirements” option is not selected, and the user is importing requirements whose Identifier already exists in the specification selected as the destination, Requirements and Systems Portal will add the suffix “Requirements and Systems Portal_import” to the identifiers of the imported requirements to differentiate them.
In case the “update requirements” option is not selected, and the user is importing requirements whose Identifiers already exist in the current project but not in the specification selected as the destination, the Requirements and Systems Portal will add a warning icon () to the identifiers that alert to a duplicate identifier in the same project.
“Use header row” selection - The user can decide to use the header row of their file or to use a general reference header row provided by Requirements and Systems Portal (i.e. Columns headers as: A; B; C;…).
Requirements and Systems Portal considers the Header row as the 1st row of any uploaded file.
“Sheet” selection - In case of having a file with multiple sheets, the user can select which sheet they want to import from.
“Starting row” definition - The user can select from which row of the imported file the data should start being collected to be inserted in Requirements and Systems Portal.
At preview level (3), users can view a preview of the file they uploaded and map its columns to fields in the Requirements and Systems Portal. This allows users to define how data from their file will correspond to specific fields in the portal by selecting the appropriate field in the “MAP TO” dropdown for each column. If the file contains headers identical to the default fields in the Requirements and Systems Portal, these fields will be automatically mapped. However, users have the option to override or adjust this automatic mapping if needed.
Currently, the following fields can be selected for the mapping:
Identifier; Text; Title; Rationale; Parents; Children; Path to Section; Type; State; Tags; Compliance; Compliance comment; Verification Methods, Applicability, Owner, Tags, Custom Columns
For verification methods, applicability and tags can be imported with more than one value for each requirement. To do so, each value should be separated by a comma.
For Applicability, compound block types can be referenced with a “/”. for example, block_A/block_B
The user must always select at least the Identifier column; if not, a warning message will be displayed until that condition is met.
While the import operation is ongoing, the user will be prompted with a loading screen. Once the process is finalized, if the import is successfully completed a message of success, the changes made (Image 8) and soft errors are displayed. If the import fails, a message of failure will be displayed. An example of a successful import with errors and Valifying of engineering values can be seen in the Video Review & Import.
The soft errors are:
Relation can’t be established → Parent or Children Identifier doesn’t exist on the project
Relation can’t be established → Parent or Children Identifier is duplicated on the project
Requirement Compliance Statement doesn't exist in the project
Requirement Type doesn't exist in the project
Requirement State doesn't exist in the project
Tag doesn't exist in the project
Applicability Condition doesn't exist
Regardless of the importer being successful or not, the user will have the opportunity to re-import or to make a new import by clicking “Import new file” (success) or “Try again” (failure), taking the user back to section 1 (Specification).
3.1 - Valify option
Upon a successful import, the user can also start the Valify process, which will scan the imported requirements text for possible quantifiable parameters to be converted to Valis inside the requirement.