Fan Tutorial 2 - Design System - Part 1
In the context of this documentation “Valispace“ will be called “Requirements and Systems Portal“.
In this tutorial, we will explore the typical use case for designing a system within the Requirements and Systems Portal. This process involves creating a digital model of the system and its breakdown, calculating performance parameters, performing trade-off studies, and making design decisions.
We will review the usecase in two parts. The first covers the system breakdown and inbuilt calculations. The second covers the trade-offs, design decisions, and adding budgets to the analysis block.
This part of the tutorial is expected to take around 25-40 minutes to finish. The values of the Blocks provided are arbitrary.
(1) Configure the Valitypes
Valitypes ensure that every new Block you create already contains Valis of a certain type with a default formula and unit (e.g. Mass, Power Consumption, etc.).
Ensure that the correct Valitypes exist.
In the left sidebar, click on the Settings symbol in the lower left-hand corner and select
Settingsfrom the drop-down.
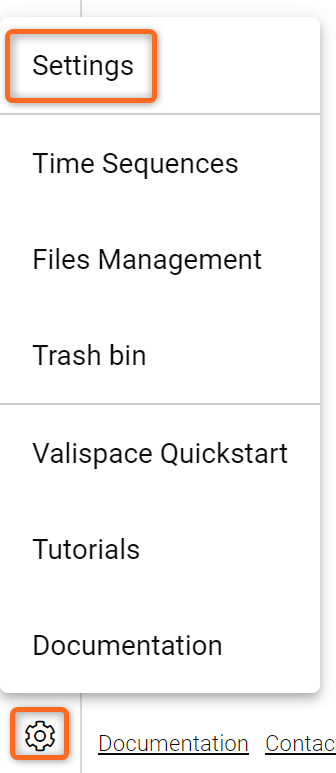
Accessing the settings of the project
Click on the
Valitypes(1) button in the navigation pane to see all the existing Valitypes (see Figure Valitypes)Now, check whether the
MassandPowerConsumptionValitypes exist.If they do not exist, add them by clicking on the
+button on the bottom right, below the page headingValitypesand add the Valitypes with the above names.Change the Valitypes properties so that your configuration looks like in the Figure Valitypes.
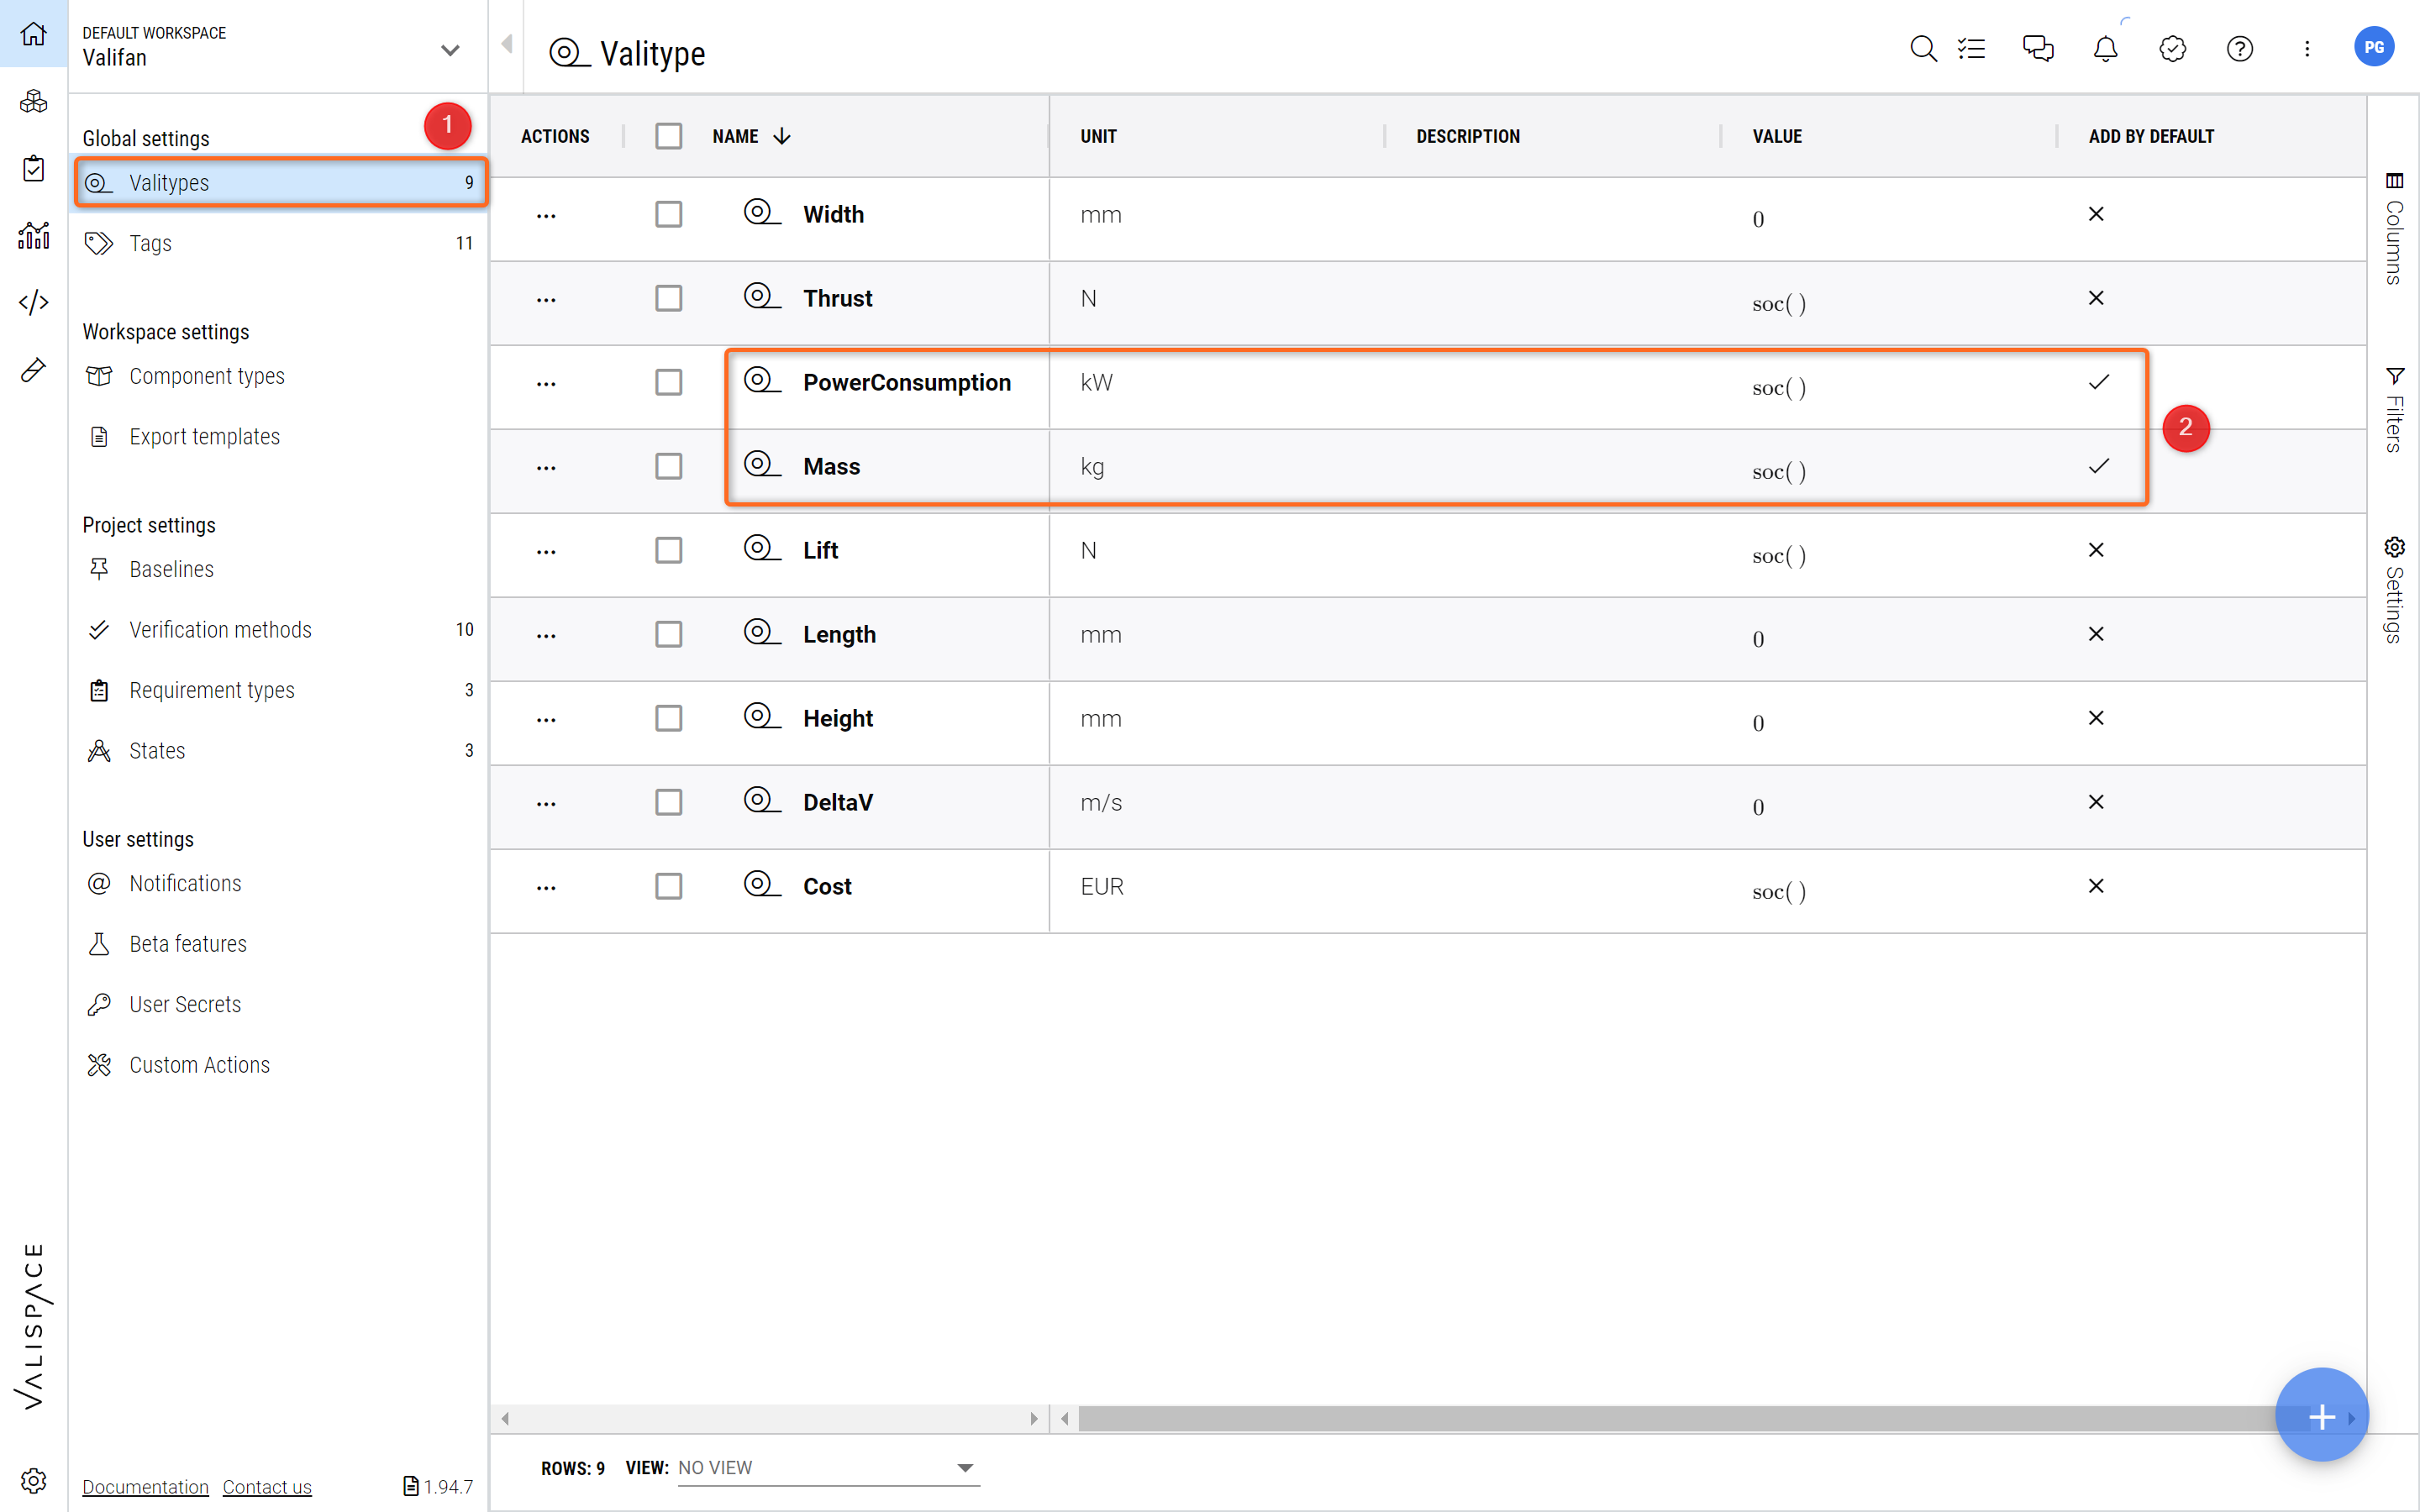
Valitypes - Enable or set up Valitypes in the Settings.
The units for the PowerConsumption might be in kW or W. If the unit is in kW, double click on the cell and delete the “kW” and Convert to “W”. Also, in this tutorial, we will use the mass property of the Blocks in grams, its your choice to keep the unit in Kg or g.
Ensure that both tick boxes
Add by Defaultare ☑ activated (2). These Valitypes will be automatically added to every new Block you create (see step 2 of this tutorial). Be aware that the Default checkbox is a user setting; this will not affect which Valitypes other users have checked as Default.
soc() means the sum of children and ensures that, by default, this Vali adds up Valis of the same type in the System Breakdown.
(2) Add Systems to your Project
Let's start building your fan! Every product can be broken down into its sub-systems, like a tree. The hierarchical system tree is one of the core features of the Requirements and Systems Portal.
Create the System “Fan”
In the System Design Module, you can create and access the System Tree, which includes all systems and sub-systems, including technical parameters (Valis). In the left sidebar, click on the System Design (1) Module.
Create a new Block using the
+ Add Block(2) button in the project navigation pane. Name the new BlockFan(3) and clickCreate(4) (see Figure Creating a new Block)
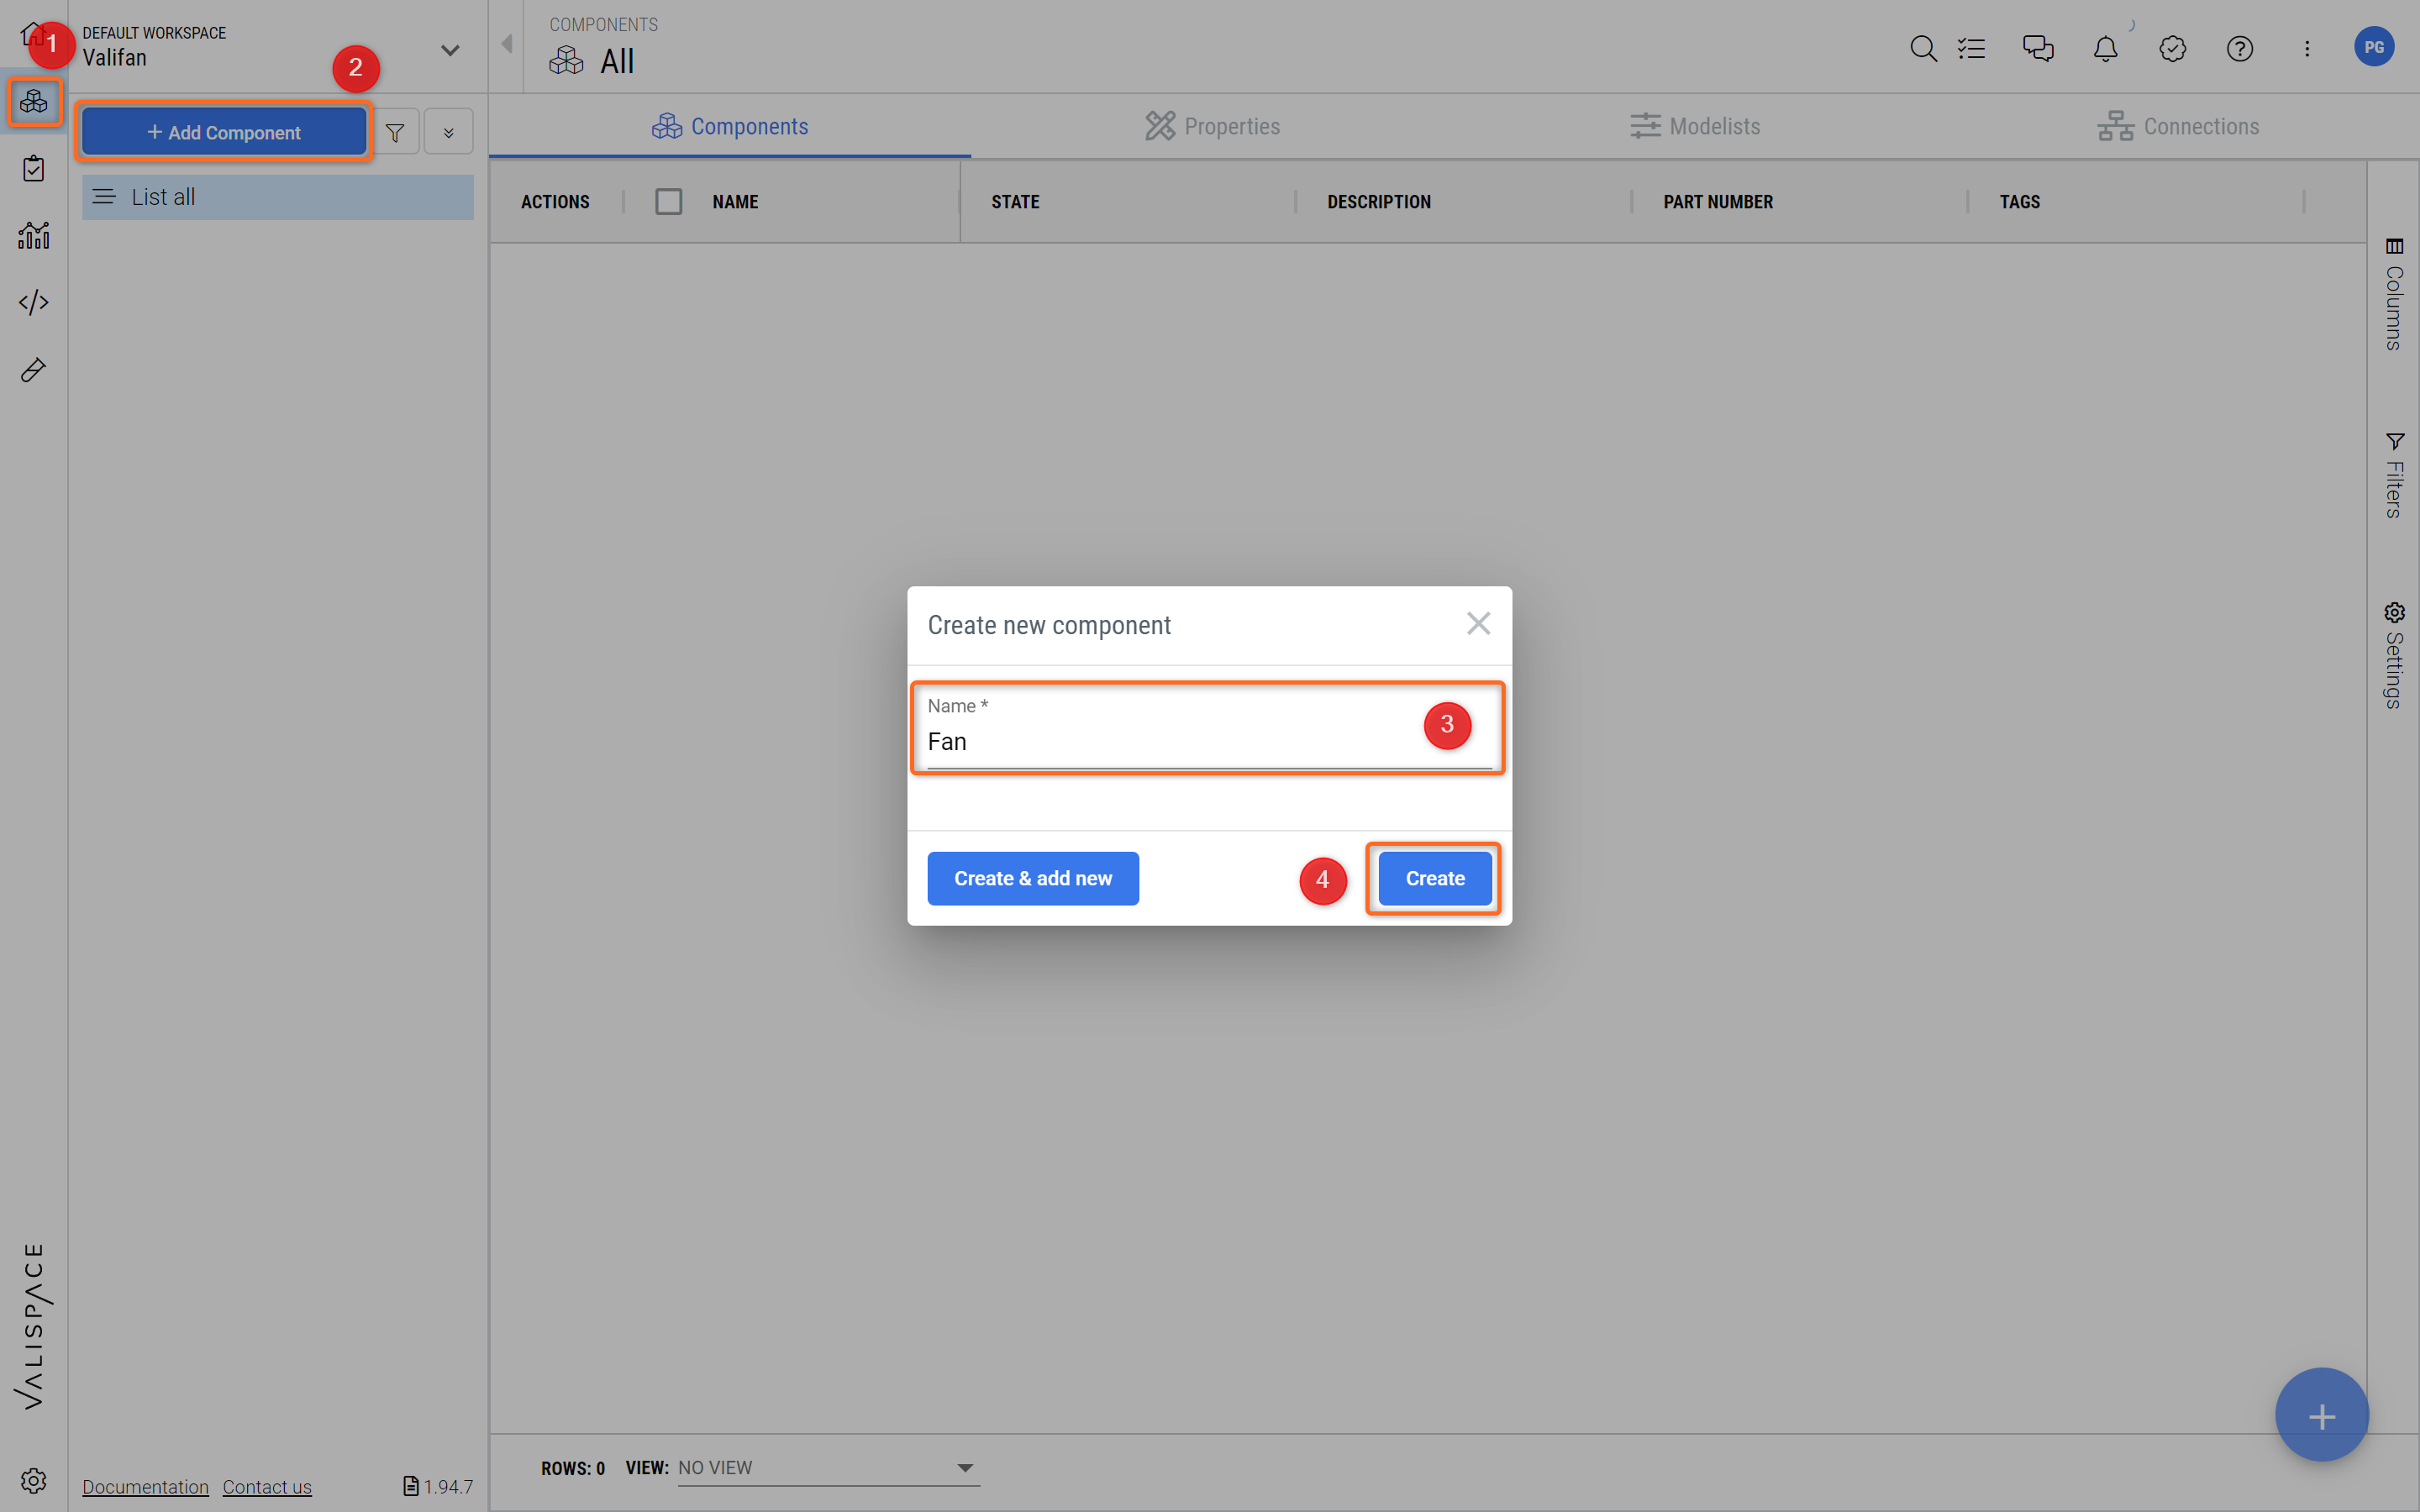
Creating a new Block - By clicking “Add Block“ you can start adding new Blocks to your Product tree.
You can see that the Valis “Mass” and “PowerConsumption”, which we configured in the Valitypes Settings, have automatically been added to your new Block. Alternatively, if you had not marked them as "Add by Default", you can always add new Valis to your Block by clicking the "Add Property" button in the lower right-hand corner (see Figure Add a new Vali).

Adding a new Vali
Breakdown the system
Since we created our system, it's time to break it down into subsystems or parts.
Now, right-click on the new
FanBlock in the navigation pane and select+ Add Block. Name the new BlockPropeller. Afterwards, expand the fan Block to see the new sub-Block in the navigation tree.Repeat to create the Fan's sub-Blocks
Motor,Speed_Controller,andStructure. You can press the “Enter” button from your keyboard or select theCreate & add newoption to create multiple Blocks without leaving the popup.Your System tree should now look like in the Figure Fan Structure.
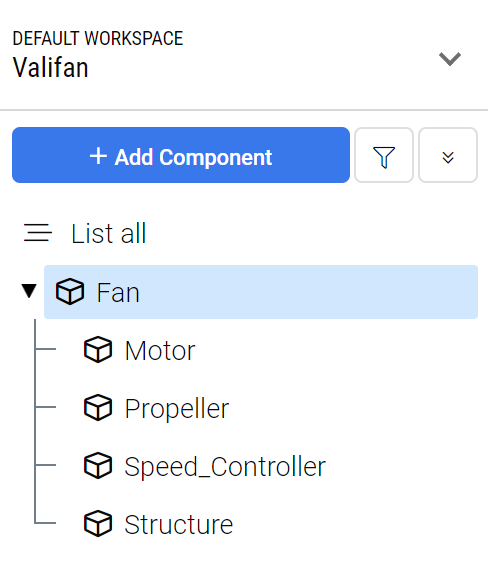
Fan Structure - The main system Fan is subdivided into its subsystems Motor, Propeller, Speed_Controller and Structure.
You can drag and drop Blocks in the tree to change their hierarchy level.
(3) Change the Technical Parameters (Valis)
In the Requirements and Systems Portal, Valis are technical parameters that contain your engineering values. Valis have properties such as formulas, values, history, and much more. Your newly created Blocks already contain two Valis, Mass and PowerConsumption. So, let's go ahead and add value to your Valis!
Change the Mass and the Power Consumption Value
If you wish to see more information and attributes for your Valis, you can simply click on the Vali name. This opens up the “details” page of the Vali, where you can also edit its formula. But for now, let's just change the values within the list view
In the list view, double-click on the
0gand0Wvalues for the following Blocks and enter the new values by double-clicking on the cells.
Remember to always input the value and its associated unit.
Please input the following values for each Block:
Motor:
Mass = 110g,PowerConsumption = 1WPropeller:
Mass = 30g,PowerConsumption = 0W(make sure to enter "0W" instead of "soc()")Speed_Controller:
Mass = 15g,PowerConsumption = 0.1WStructure:
Mass = 80g,PowerConsumption = 0W(make sure to enter "0W" instead of "soc()")See the example in Figure Adding Mass to the Motor to see how it is done.
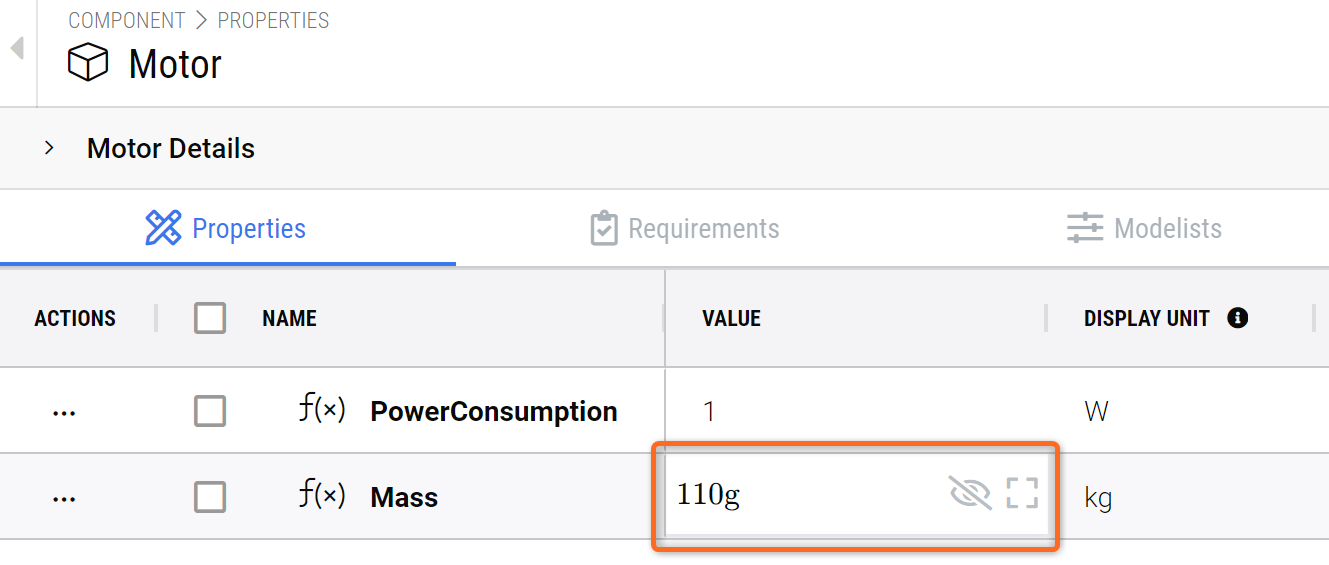
Adding Mass to the Motor - Example of adding a mass value to the motor.
Note that the Requirements and Systems Portal has automatically calculated the total Mass of the Fan to 235g or 0.235 kg and its total PowerConsumption to 1.1W.
When users input the “Value” of a property, it is essential to include both the numerical value and its unit, formulated together, as showcased in the example above: 110g.
In the “Display Unit” column, users are empowered to specify the unit they wish the value to be represented in. Thus, by initially inputting the value as 110g and setting the “Display Unit” as kg, the calculation engine will seamlessly convert and display it as 0.11kg.
Note that for calculations, the calculation engine uses the unit provided in the "Value" field. If a user requires the unit to be displayed in an different format, like pounds (lbs), the calculation engine will convert the displayed unit accordingly. Learn More about the list of units used by the calculation engine.
Please make sure to always use dots (.) as decimal separators for your values.
(4) Add a new Vali
In previous steps, we have shown how to add Valitypes. However, Valis (properties) are not restricted to mass and power consumption alone. Different properties can be added to the Blocks. In the Requirements and Systems Portal, the user can create new Valis that can be a number with a unit or unitless. It can also be a matrix, textvali (e.g., material), datevali (e.g., purchase date) and datasets(two dimensions). You can access Valis in formulas using the $ symbol in any field.
Add the Propeller Efficiency and Delivered Power
Go to the Propeller Block.
Select the
+button in the lower right-hand corner (1) to open theCreate Propertydialogue. TypeEfficiency(2) in the 'Name' field and0.85in theFormulafield (3)Leave the unit field empty and click
Create(4)
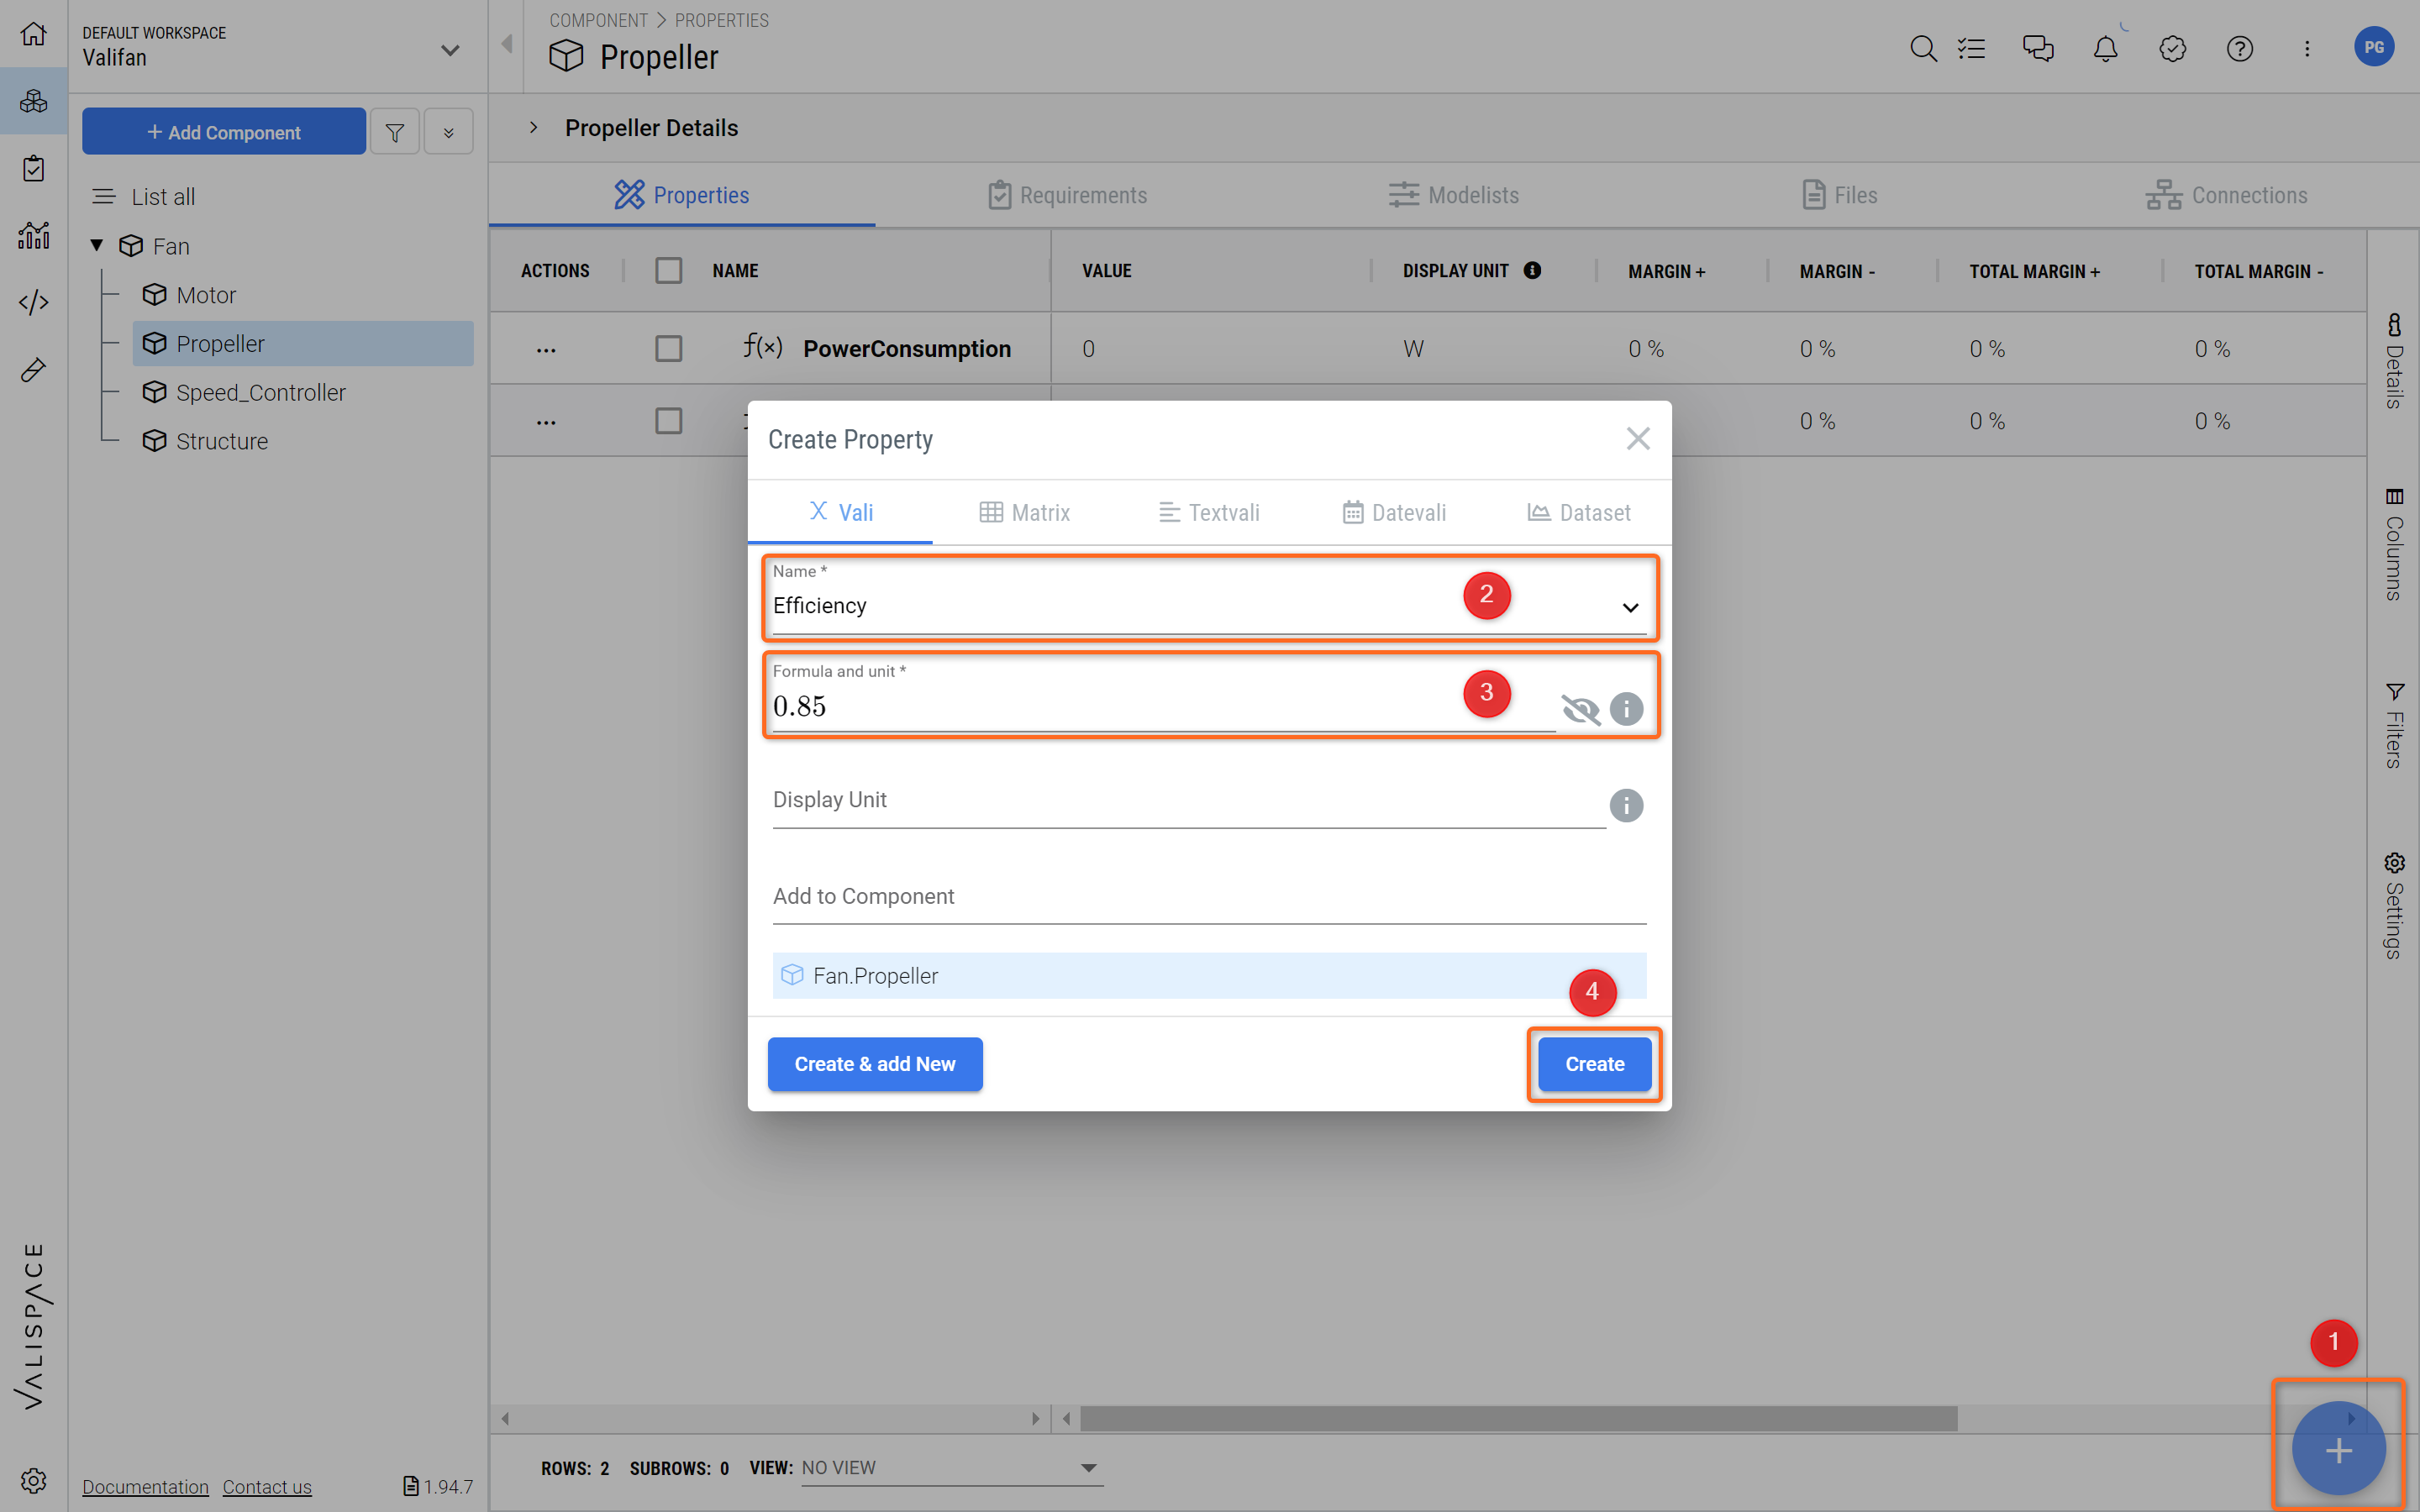
Adding an Efficiency Vali - You can add different properties and make your system description as complex as you like.
Repeat for another Vali with the name
power_deliveredand add the formula as$Motor.PowerConsumption*$Propeller.efficiency, a drop-down will appear where you can choose the desired Vali after you start typing the dollar sign ($).
PowerUserTip: to access a Vali from a different project in a formula or analysis, just type: $Valiname and click on From other projects.
Leave the unit field empty, so that the Requirements and Systems Portal automatically assigns the right unit based on the calculation (W), then click
Create. The Valis of Propeller should now look like in Figure Creating valis and using them in formulas.
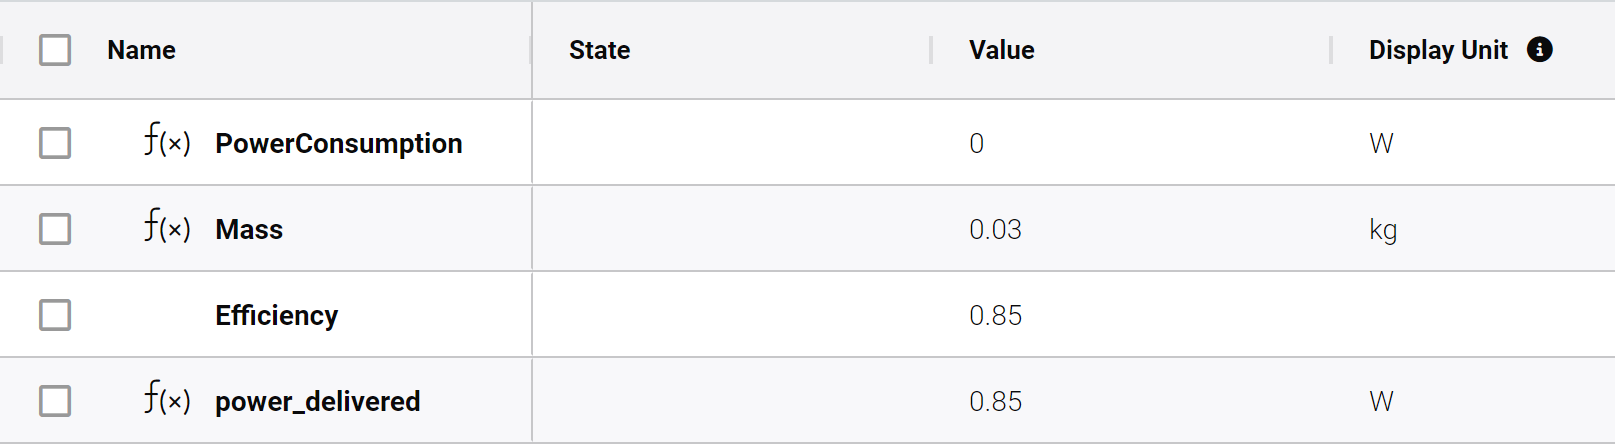
Creating valis and using them in formulas - By using the dollar sign ($) you can pull Valis into the formula fields and perform calculations.
By clicking on the name of a specific Vali you will be presented with additional information and Properties. Try it out by clicking on the
power_deliveredVali. You will see the view shown below.
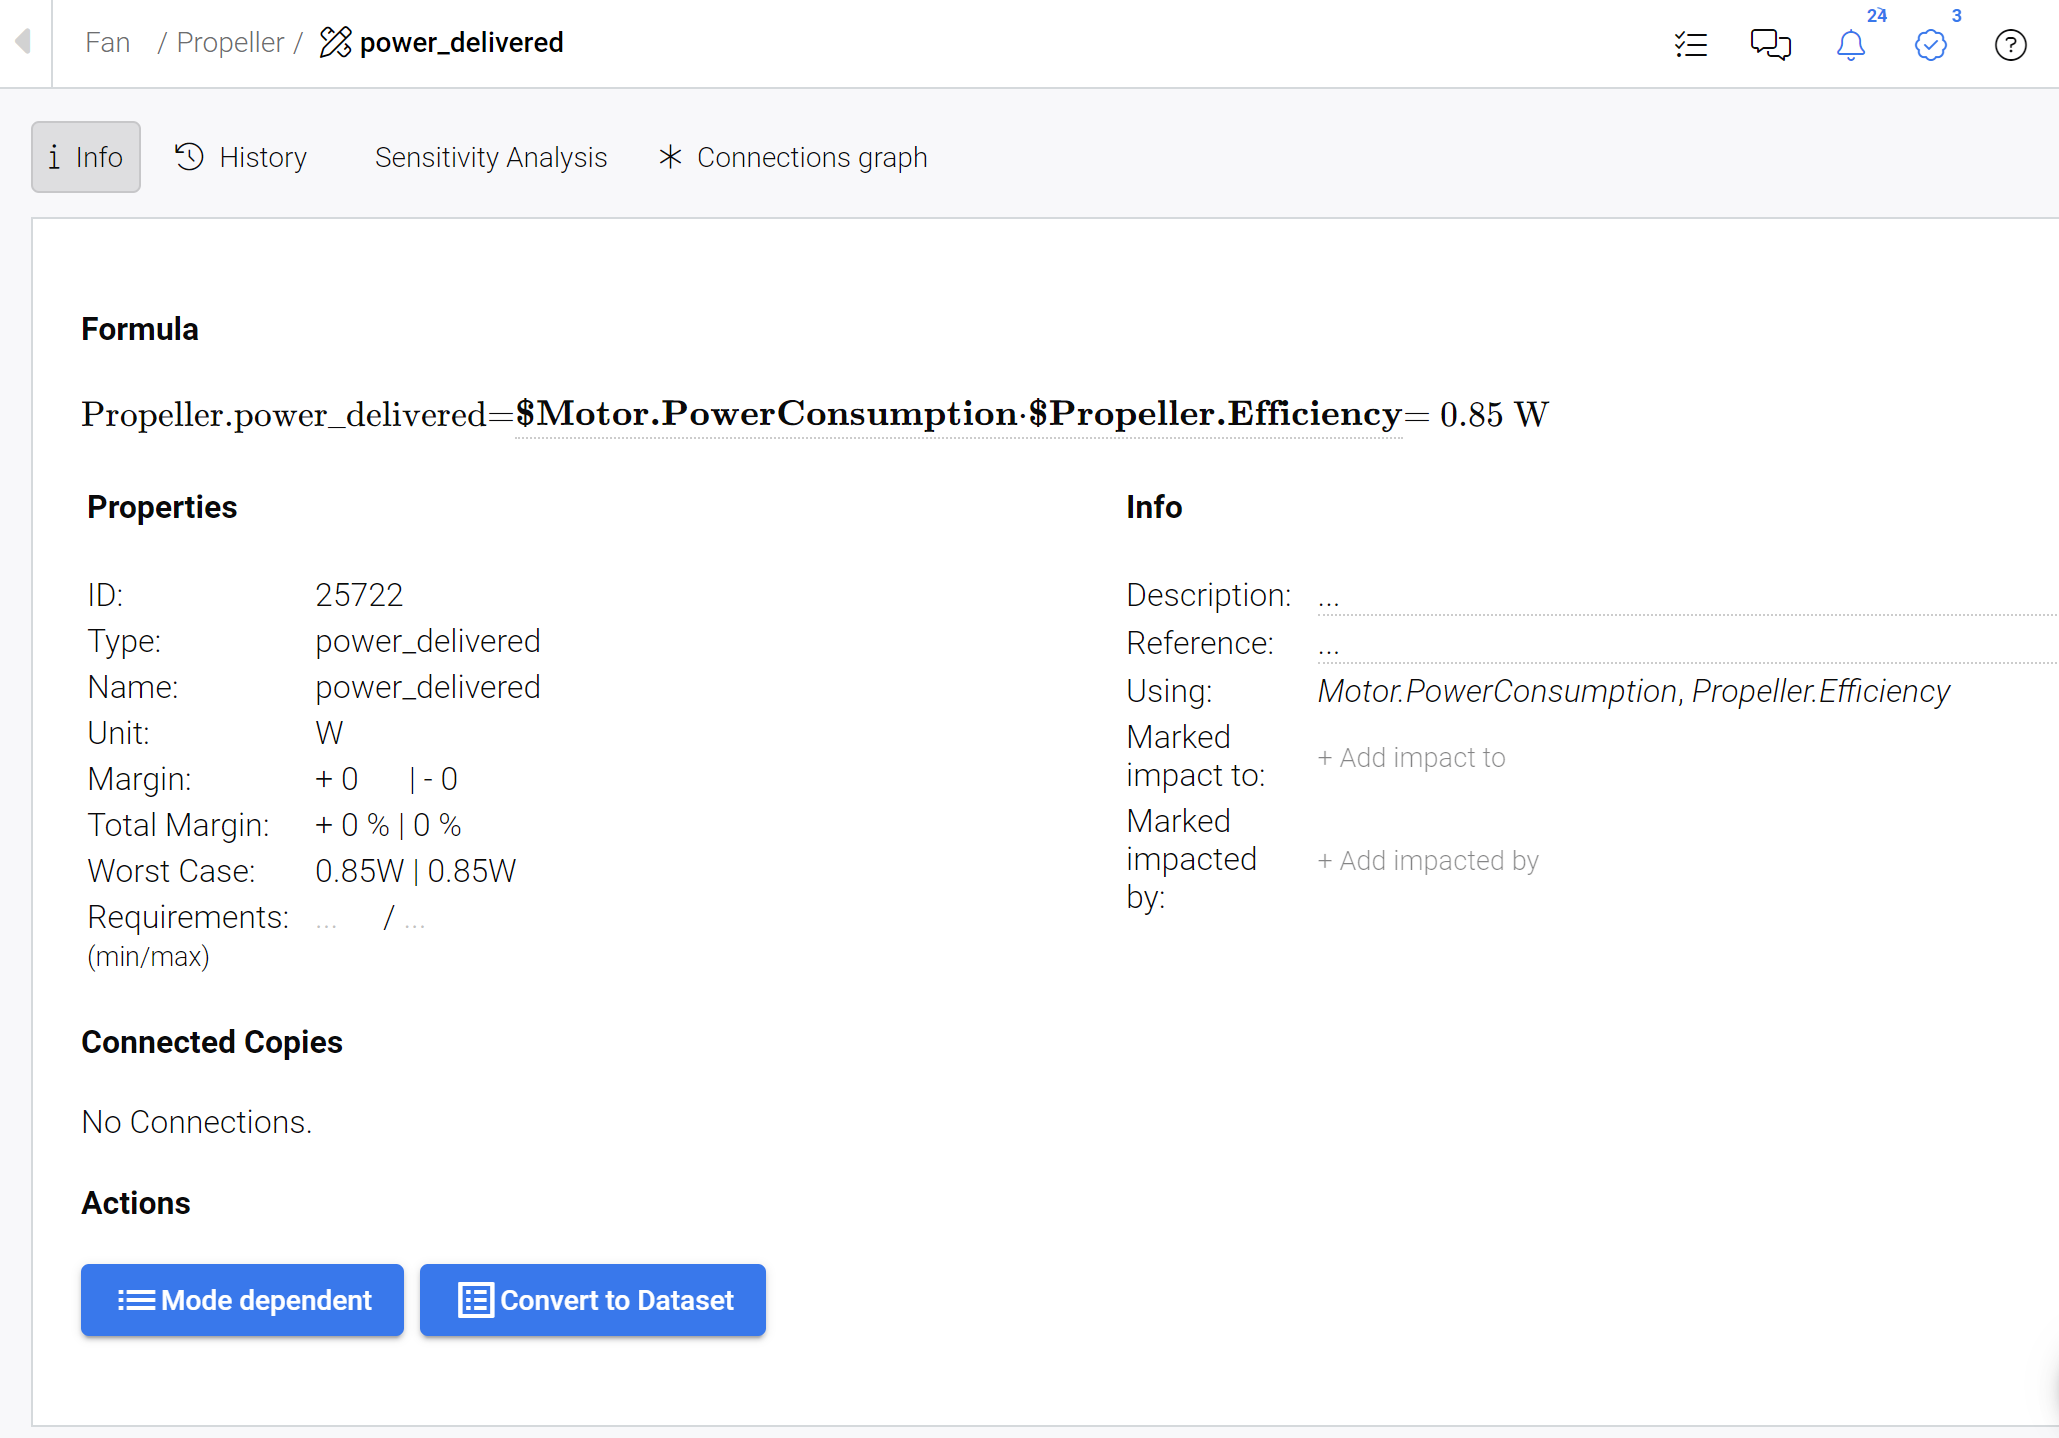
The details view of a Vali - Here, you can see Formula, Properties, Info, Connected Copies, Actions and have access to additional features, such as History, Sensitivity Analysis and the Connections Graph.
(5) Detail your Design and Reuse Blocks
Once you have a basic design in place, you can create a more detailed model of your product. If there are Blocks that need to be duplicated, you can utilize the "connected copies" feature. This ensures that they remain synchronized: if you make changes to one connected Block, all others will be automatically updated as well.
In our example, we have three rotor blades and all of them are the same.
Create three connected rotor blades.
Right-click on the Propeller Block and click
+ Add Blockto create a sub-Block namedBlade1.After creating this Block, right-click on it and select
Copy & connect. A new connected BlockBlade2appears on the same level.Repeat the previous step also to generate
Blade3.Select any of the three blades and change its
Massto10gand thePowerConsumptionto0W. You can verify that all connected blades now have the sameMassandPowerConsumption.
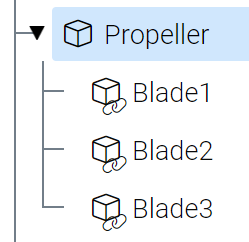
Connected Copies - Three connected Blades all sharing the same properties.
PowerUserTip: you can disconnect Valis or entire Blocks. For more information, please check connected copies and documentation.
Mass Budgets
All Valis with the formula ”soc()”, or Sum of Children, have an associated budget table and chart which can be viewed in the Vali information (see Figure Budget Tables).
Head to the “Fan“ Block and click on the
MassVali to open the details tab. Click on “Budget” (1) in the details tab highlighted below to view a breakdown of your fan’s total mass.You can expand the structure by clicking on the arrows (2 and 3).
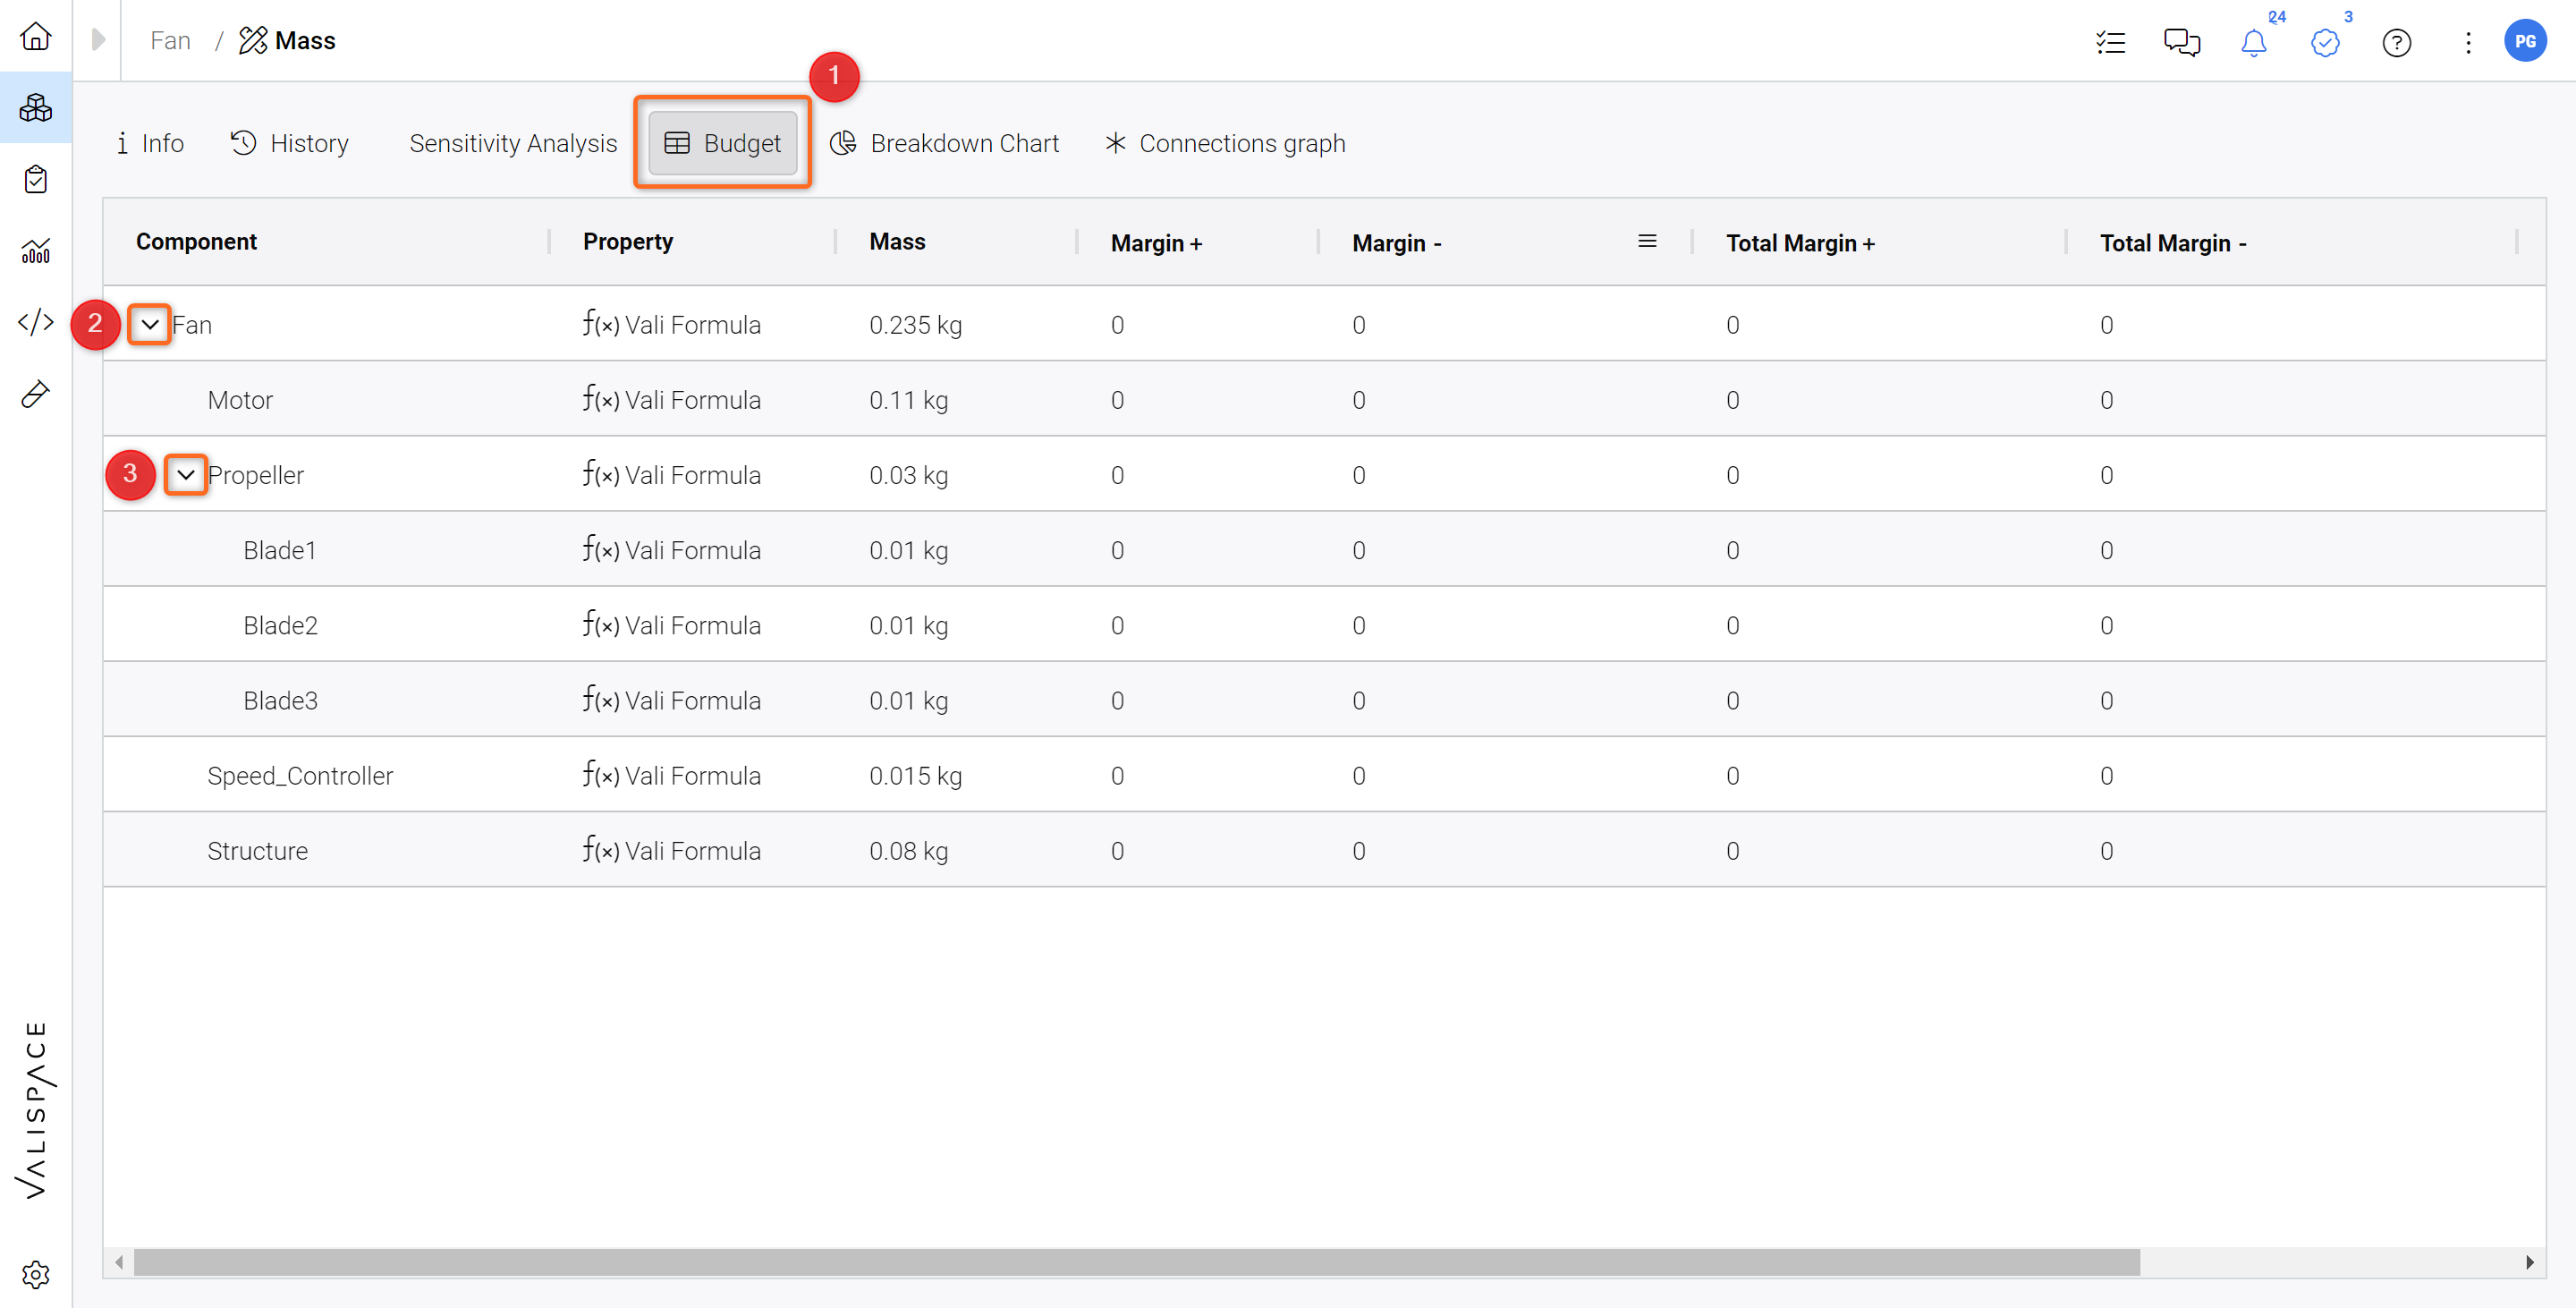
Budget Tables - Accessing the Mass budget table within the details section.
Within the details section, Click on the pie chart (1) highlighted below to view a breakdown of the total mass of your fan. The pie chart shows you the mass breakdown for your immediate lower level of subsystems.
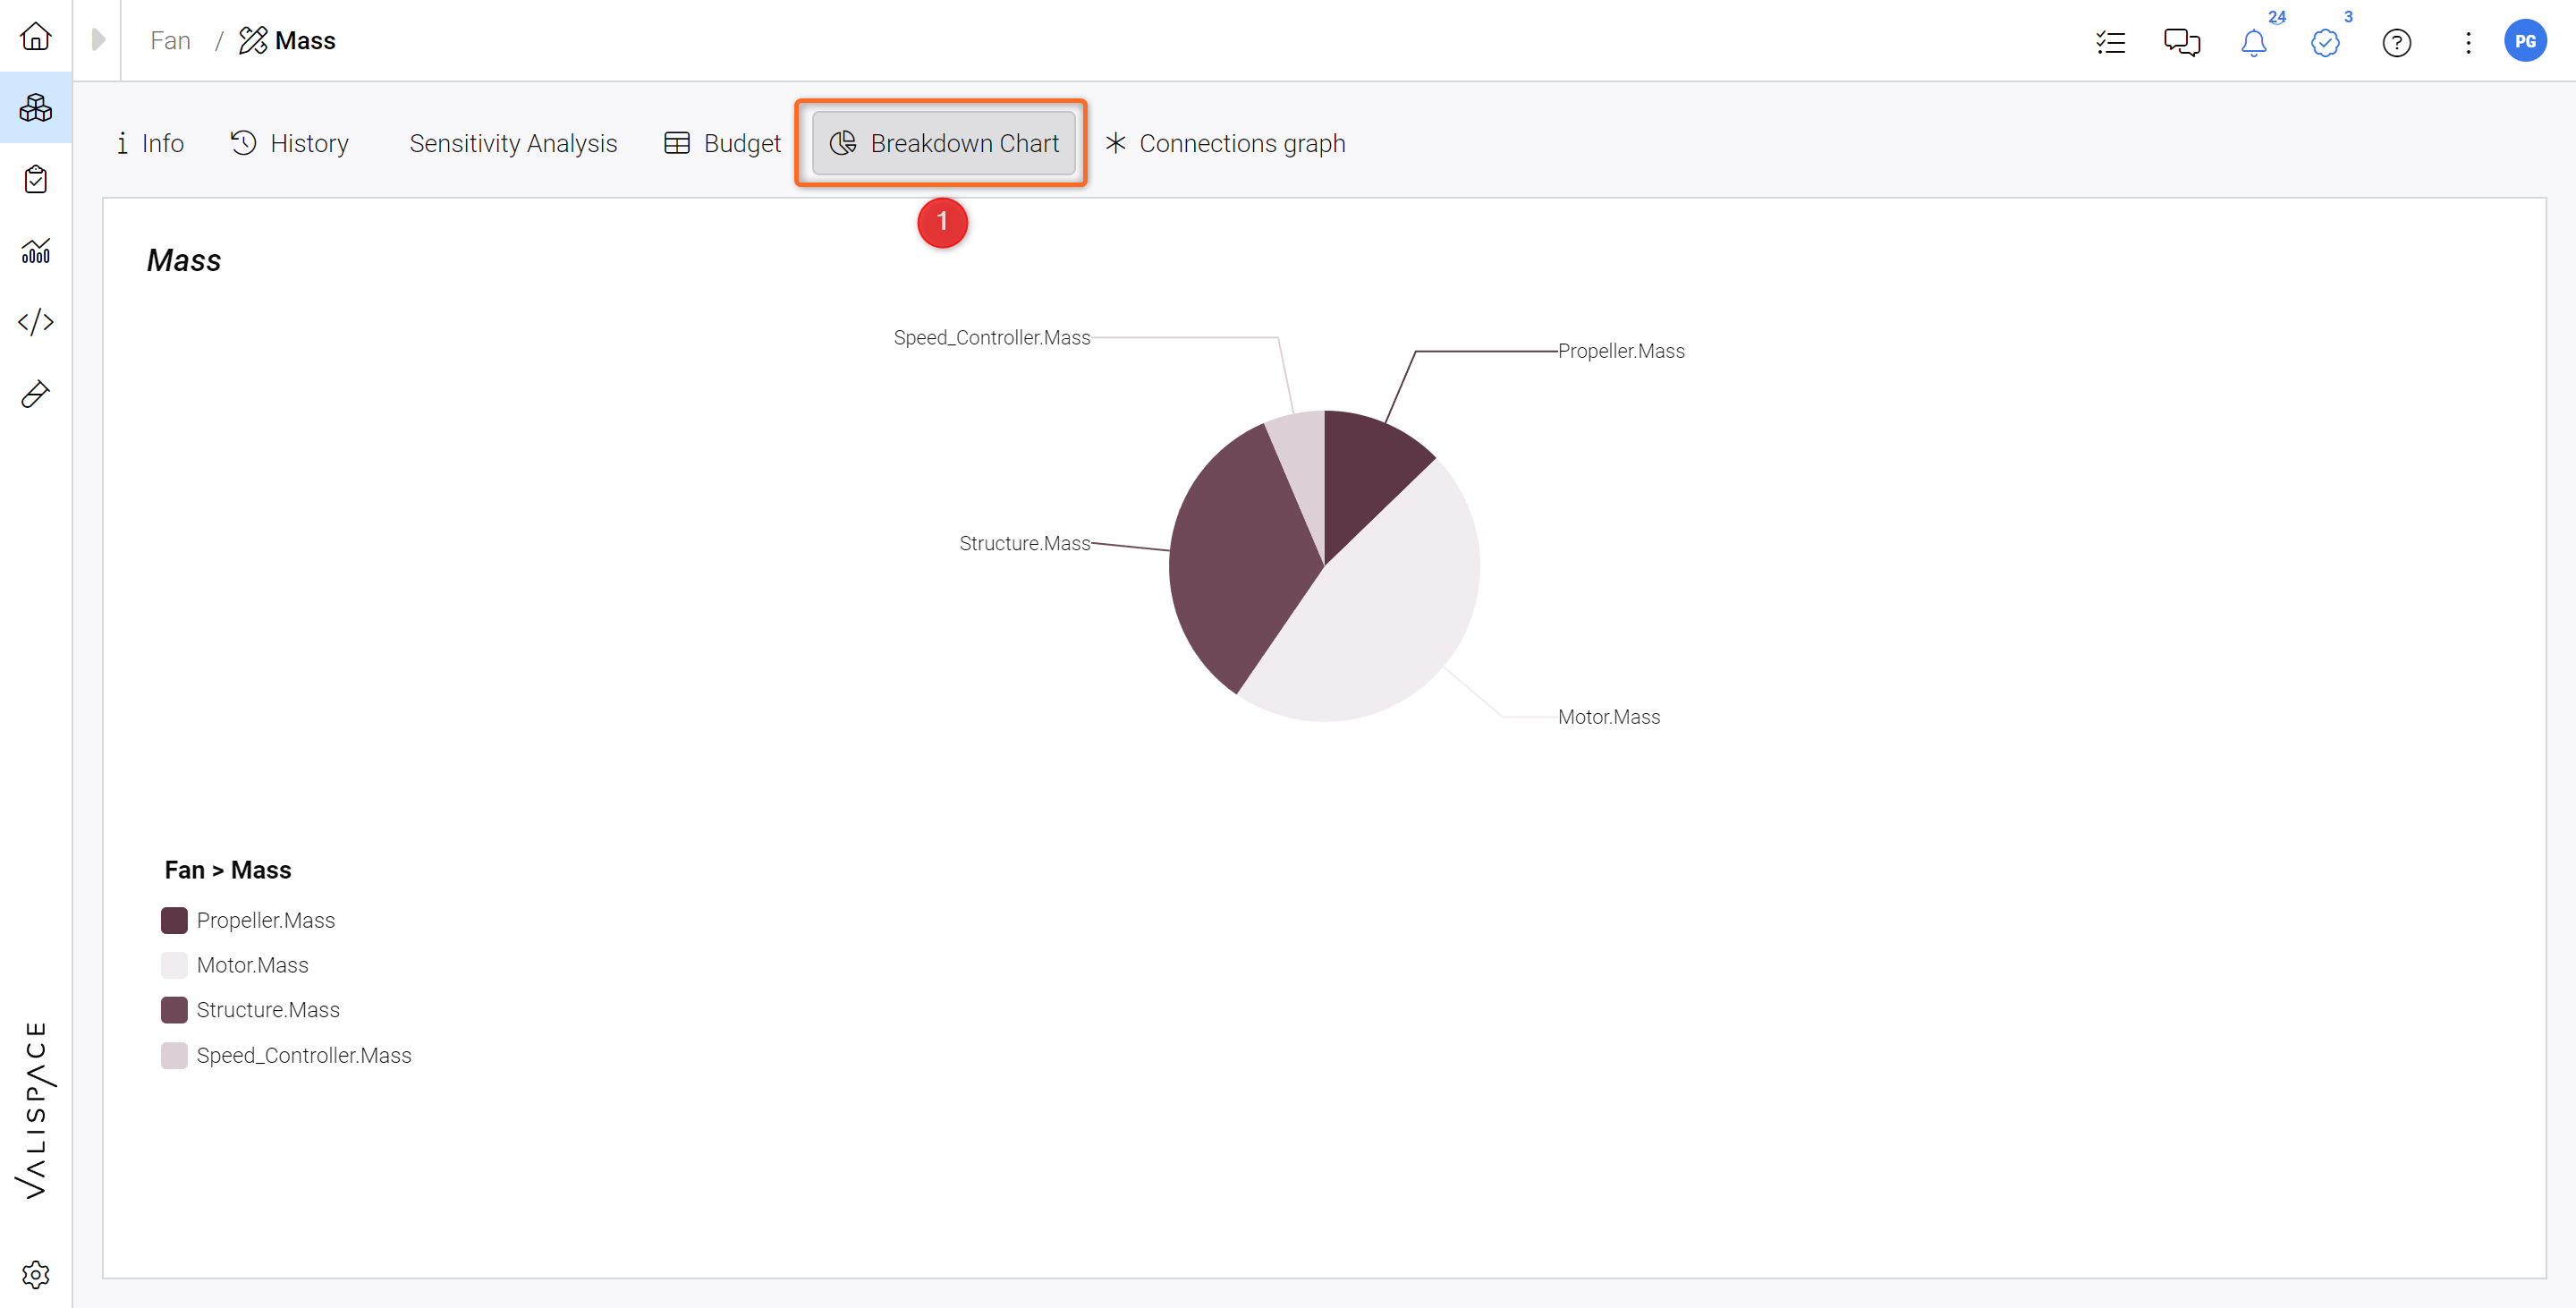
Budget Pie Charts - Accessing the Mass budget chart within the details section.
(6) Make use of Margins
At an early development stage, you are usually not sure about the exact values of any property. This is why adding a margin to the value can be helpful. The Requirements and Systems Portal propagates this uncertainty throughout all your calculations (linear uncertainty propagation).
Add Margins to your Vali Table Column
Click on the Propeller Block. In the table, check if the Margin columns are visible. If not, click on the columns tab (on the right - see Figure Margins) (1).
From the list, tick
Margin+andMargin-(2).
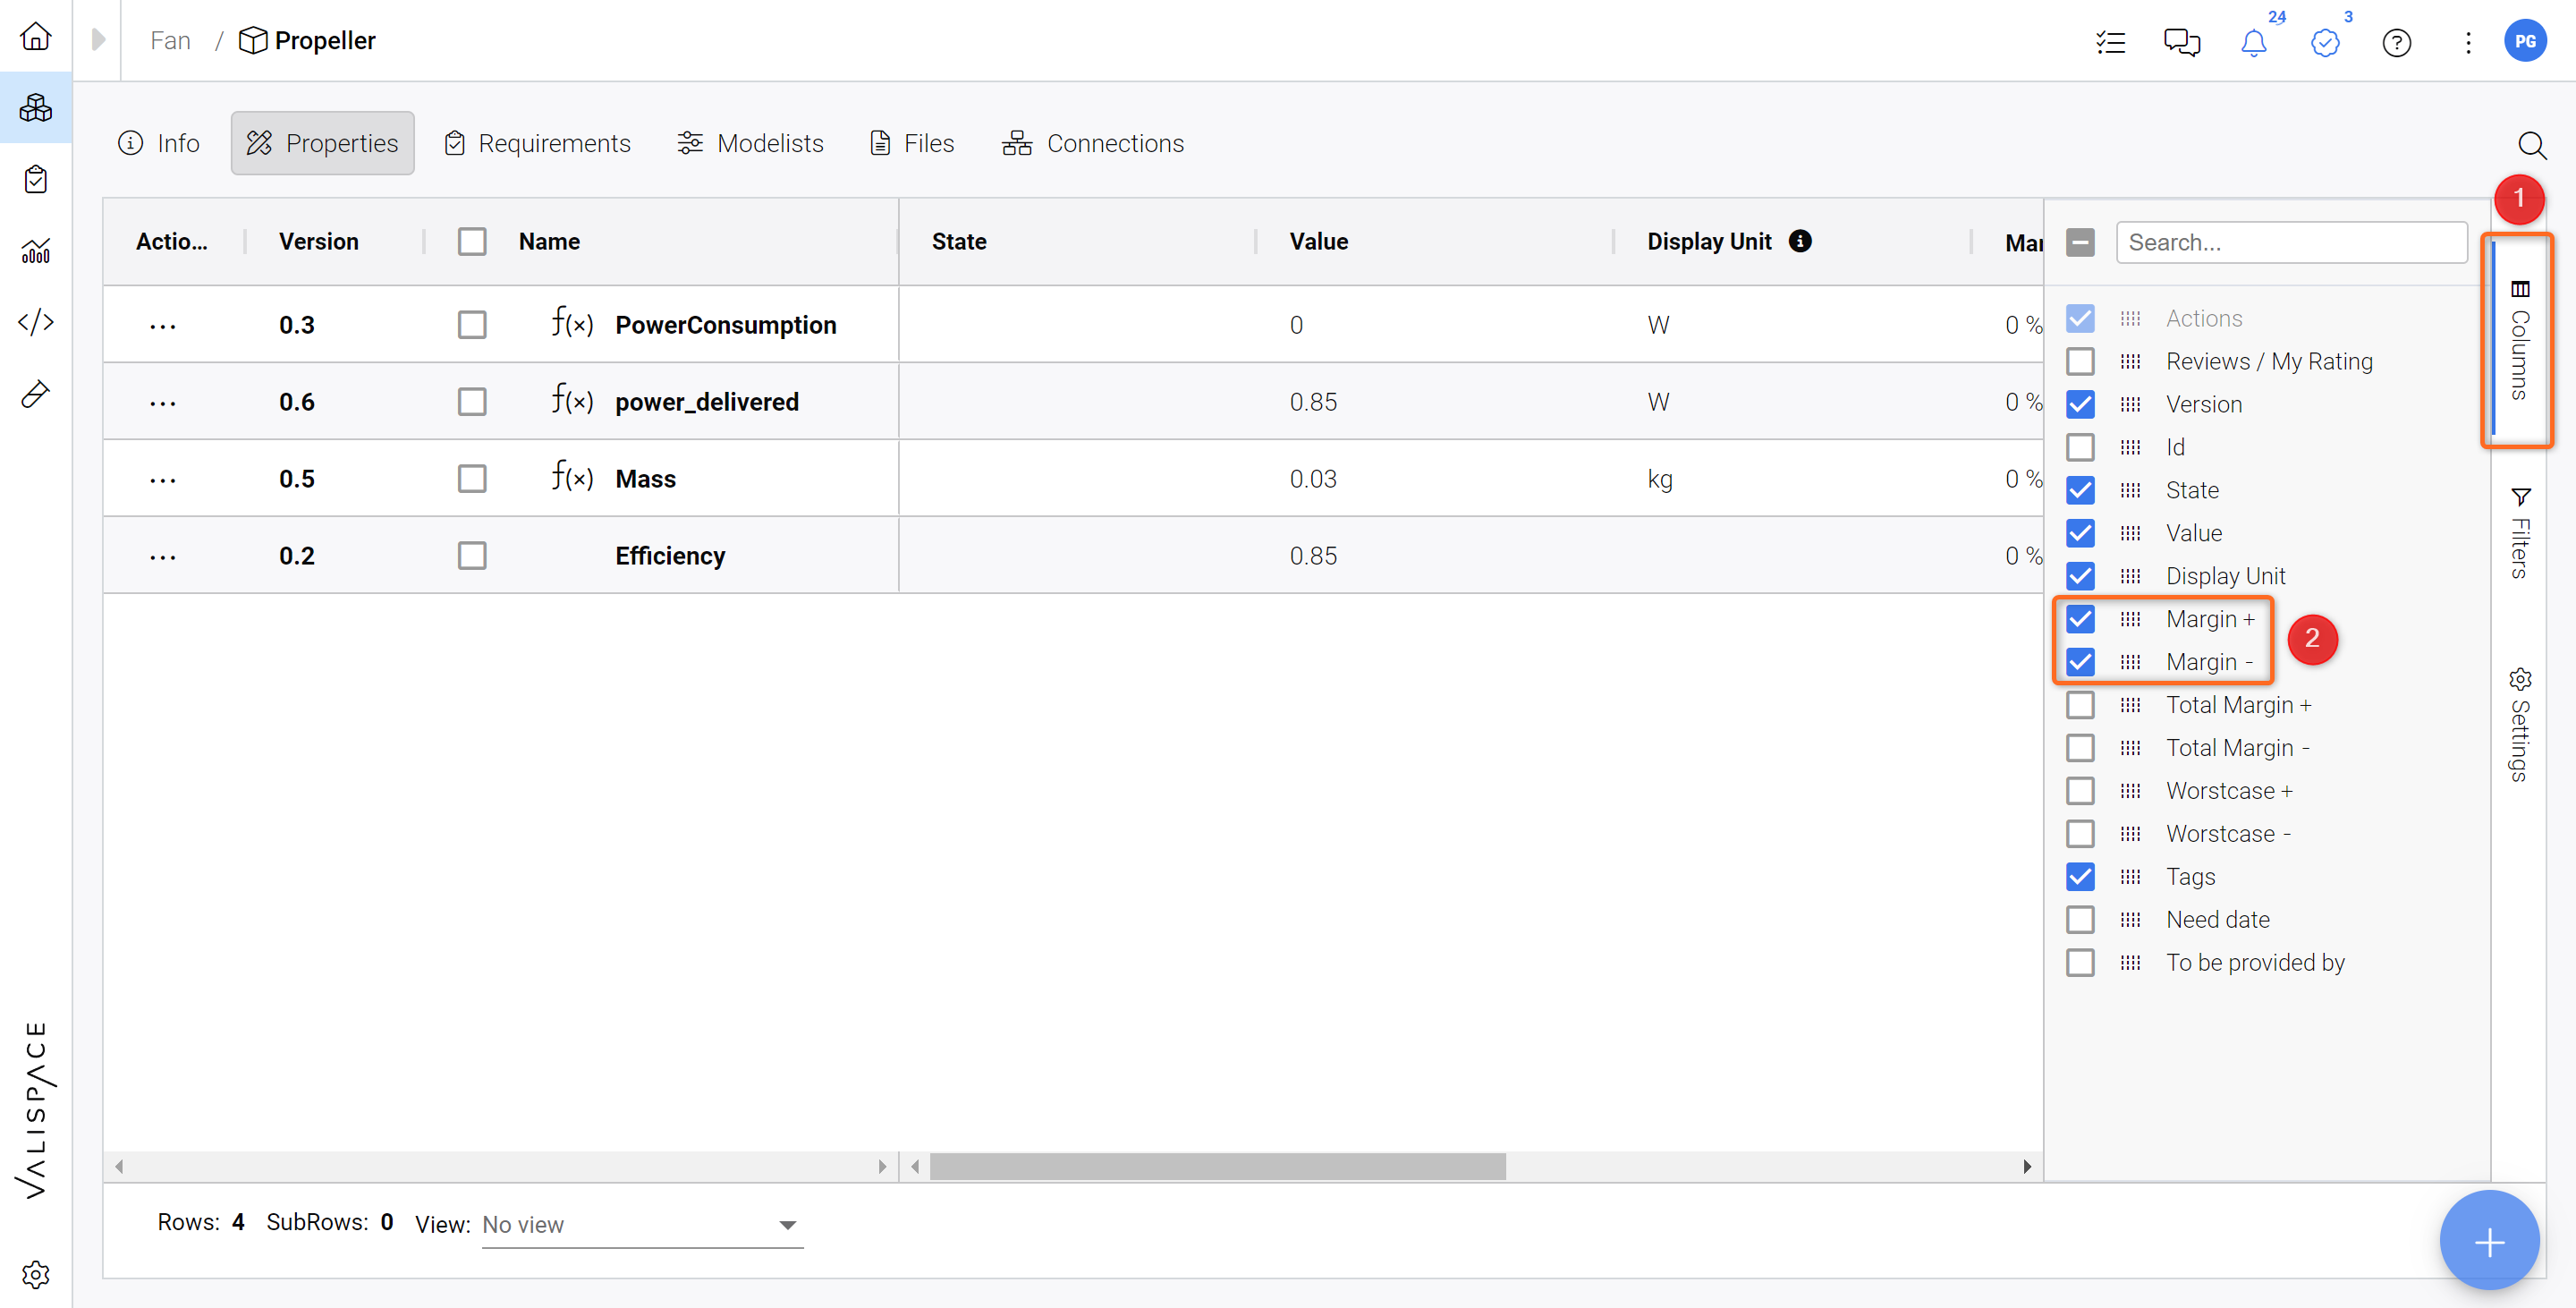
Margins - Enabling the Margin columns.
Add an uncertainty margin to the propeller Mass.
At the early design stages, you might not know the mass's final value; in most cases, you end up with a mass higher than expected. For these cases, you can add a security margin to your Vali. With the help of this margin, the Requirements and Systems Portal automatically calculates a worst-case for your Vali. Let's do this for example with the Propeller mass (see Figure Margins on Valis).
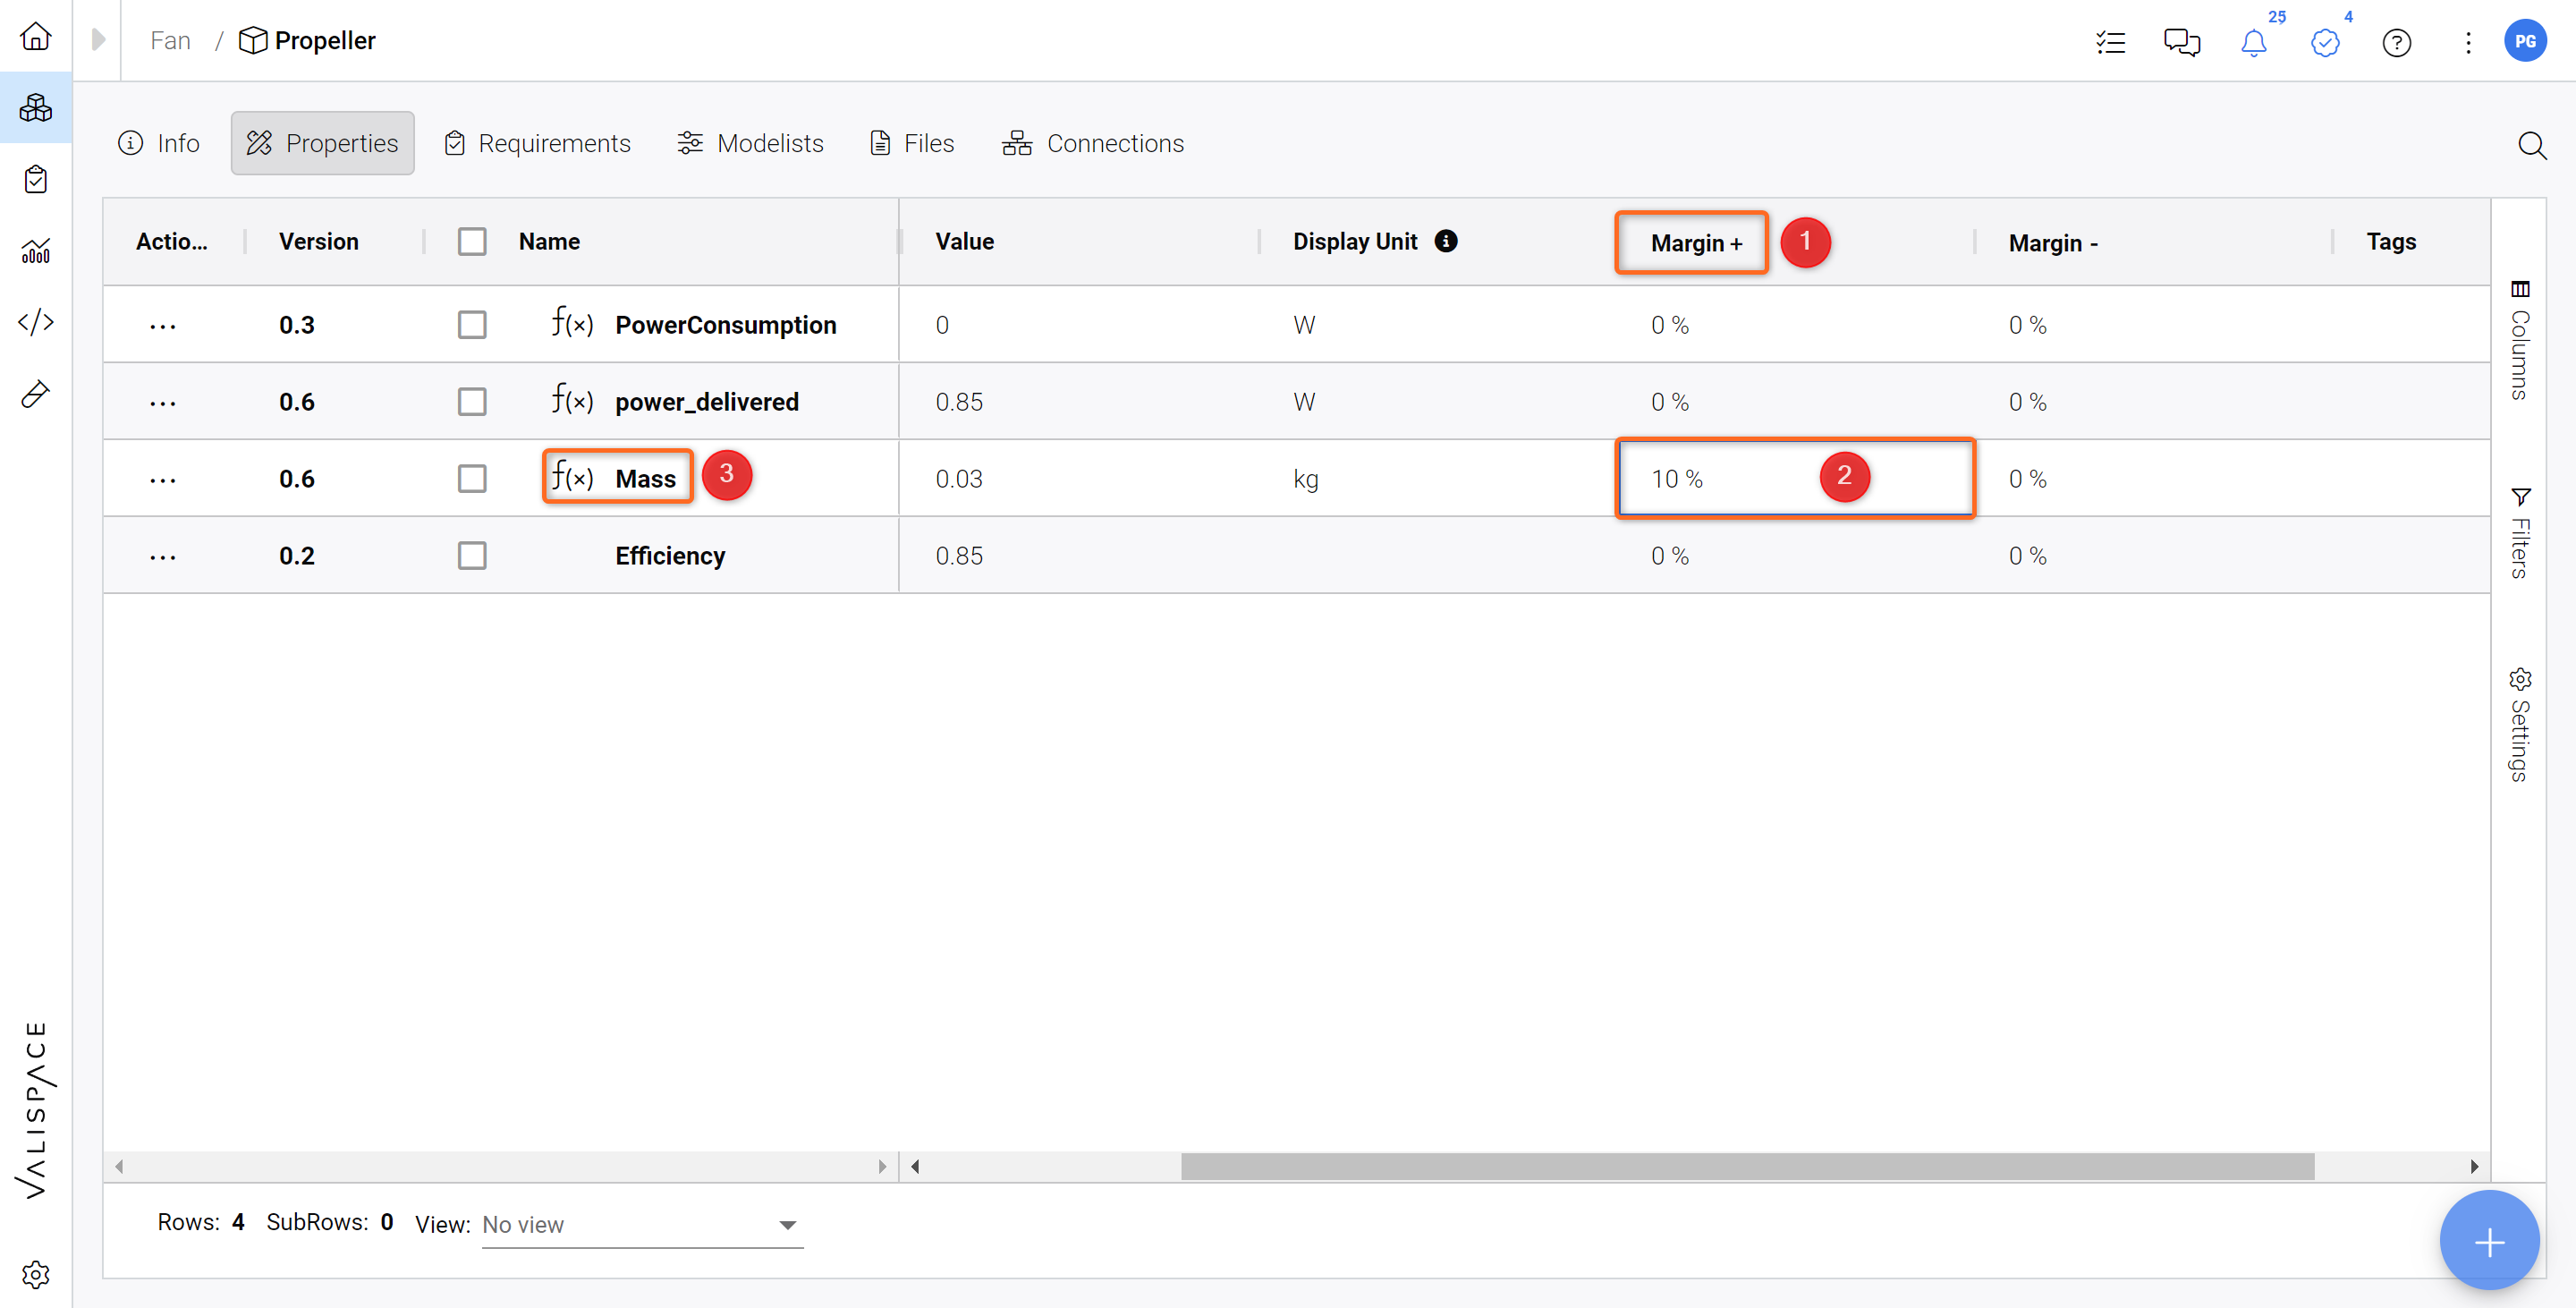
Click on the Propeller Block and go to the
MassVali.Add an upper margin "Margin+" (1) to the Vali by double-clicking into the cell and entering a value of 10 (meaning a 10% margin+) (2).
Adding Margin+ to the mass vali of the propeller - Add 10 percent margin+ on the vali.
Open the details tab of the Propeller
Mass(by clicking on theMassvali (3)). This shows you how the worst case value is now 0.033kg due to the 10% margin+.
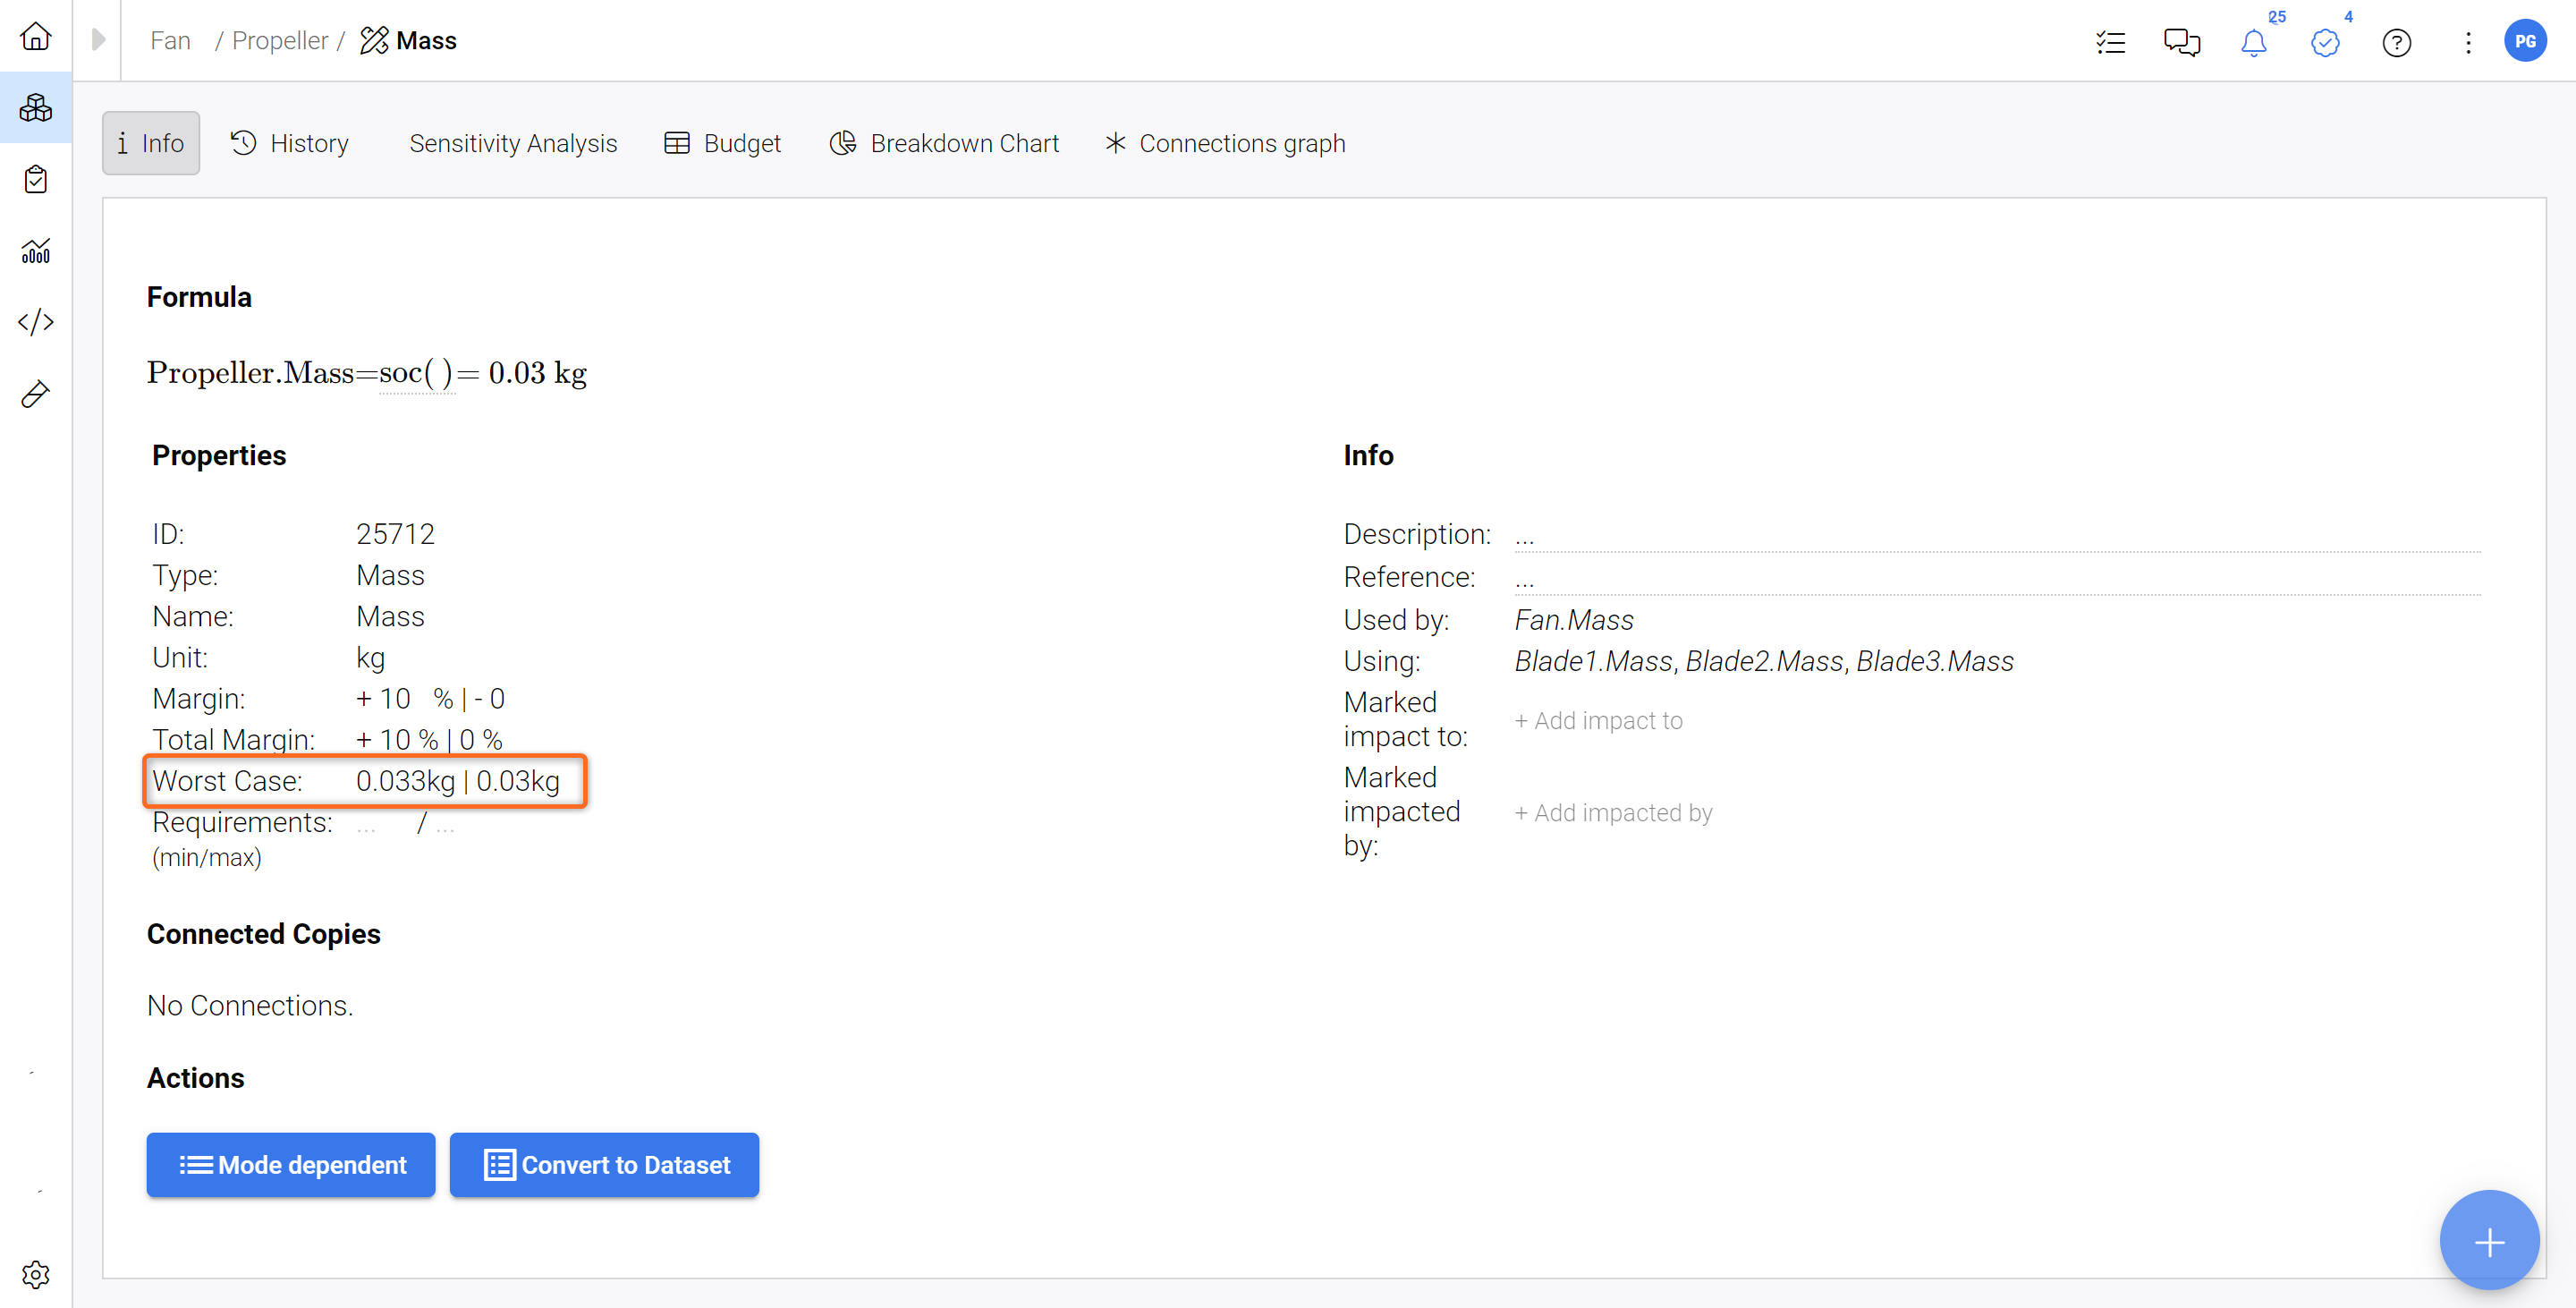
Propeller worst case value - The worst case value is calculated for the propeller mass based on the defined margins.
If you now go to the Fan Block and go into the Fan's
Massdetails, you can see that the Fan'sMassnow has a total margin of +1.28% and a worst-case of 0.238kg.
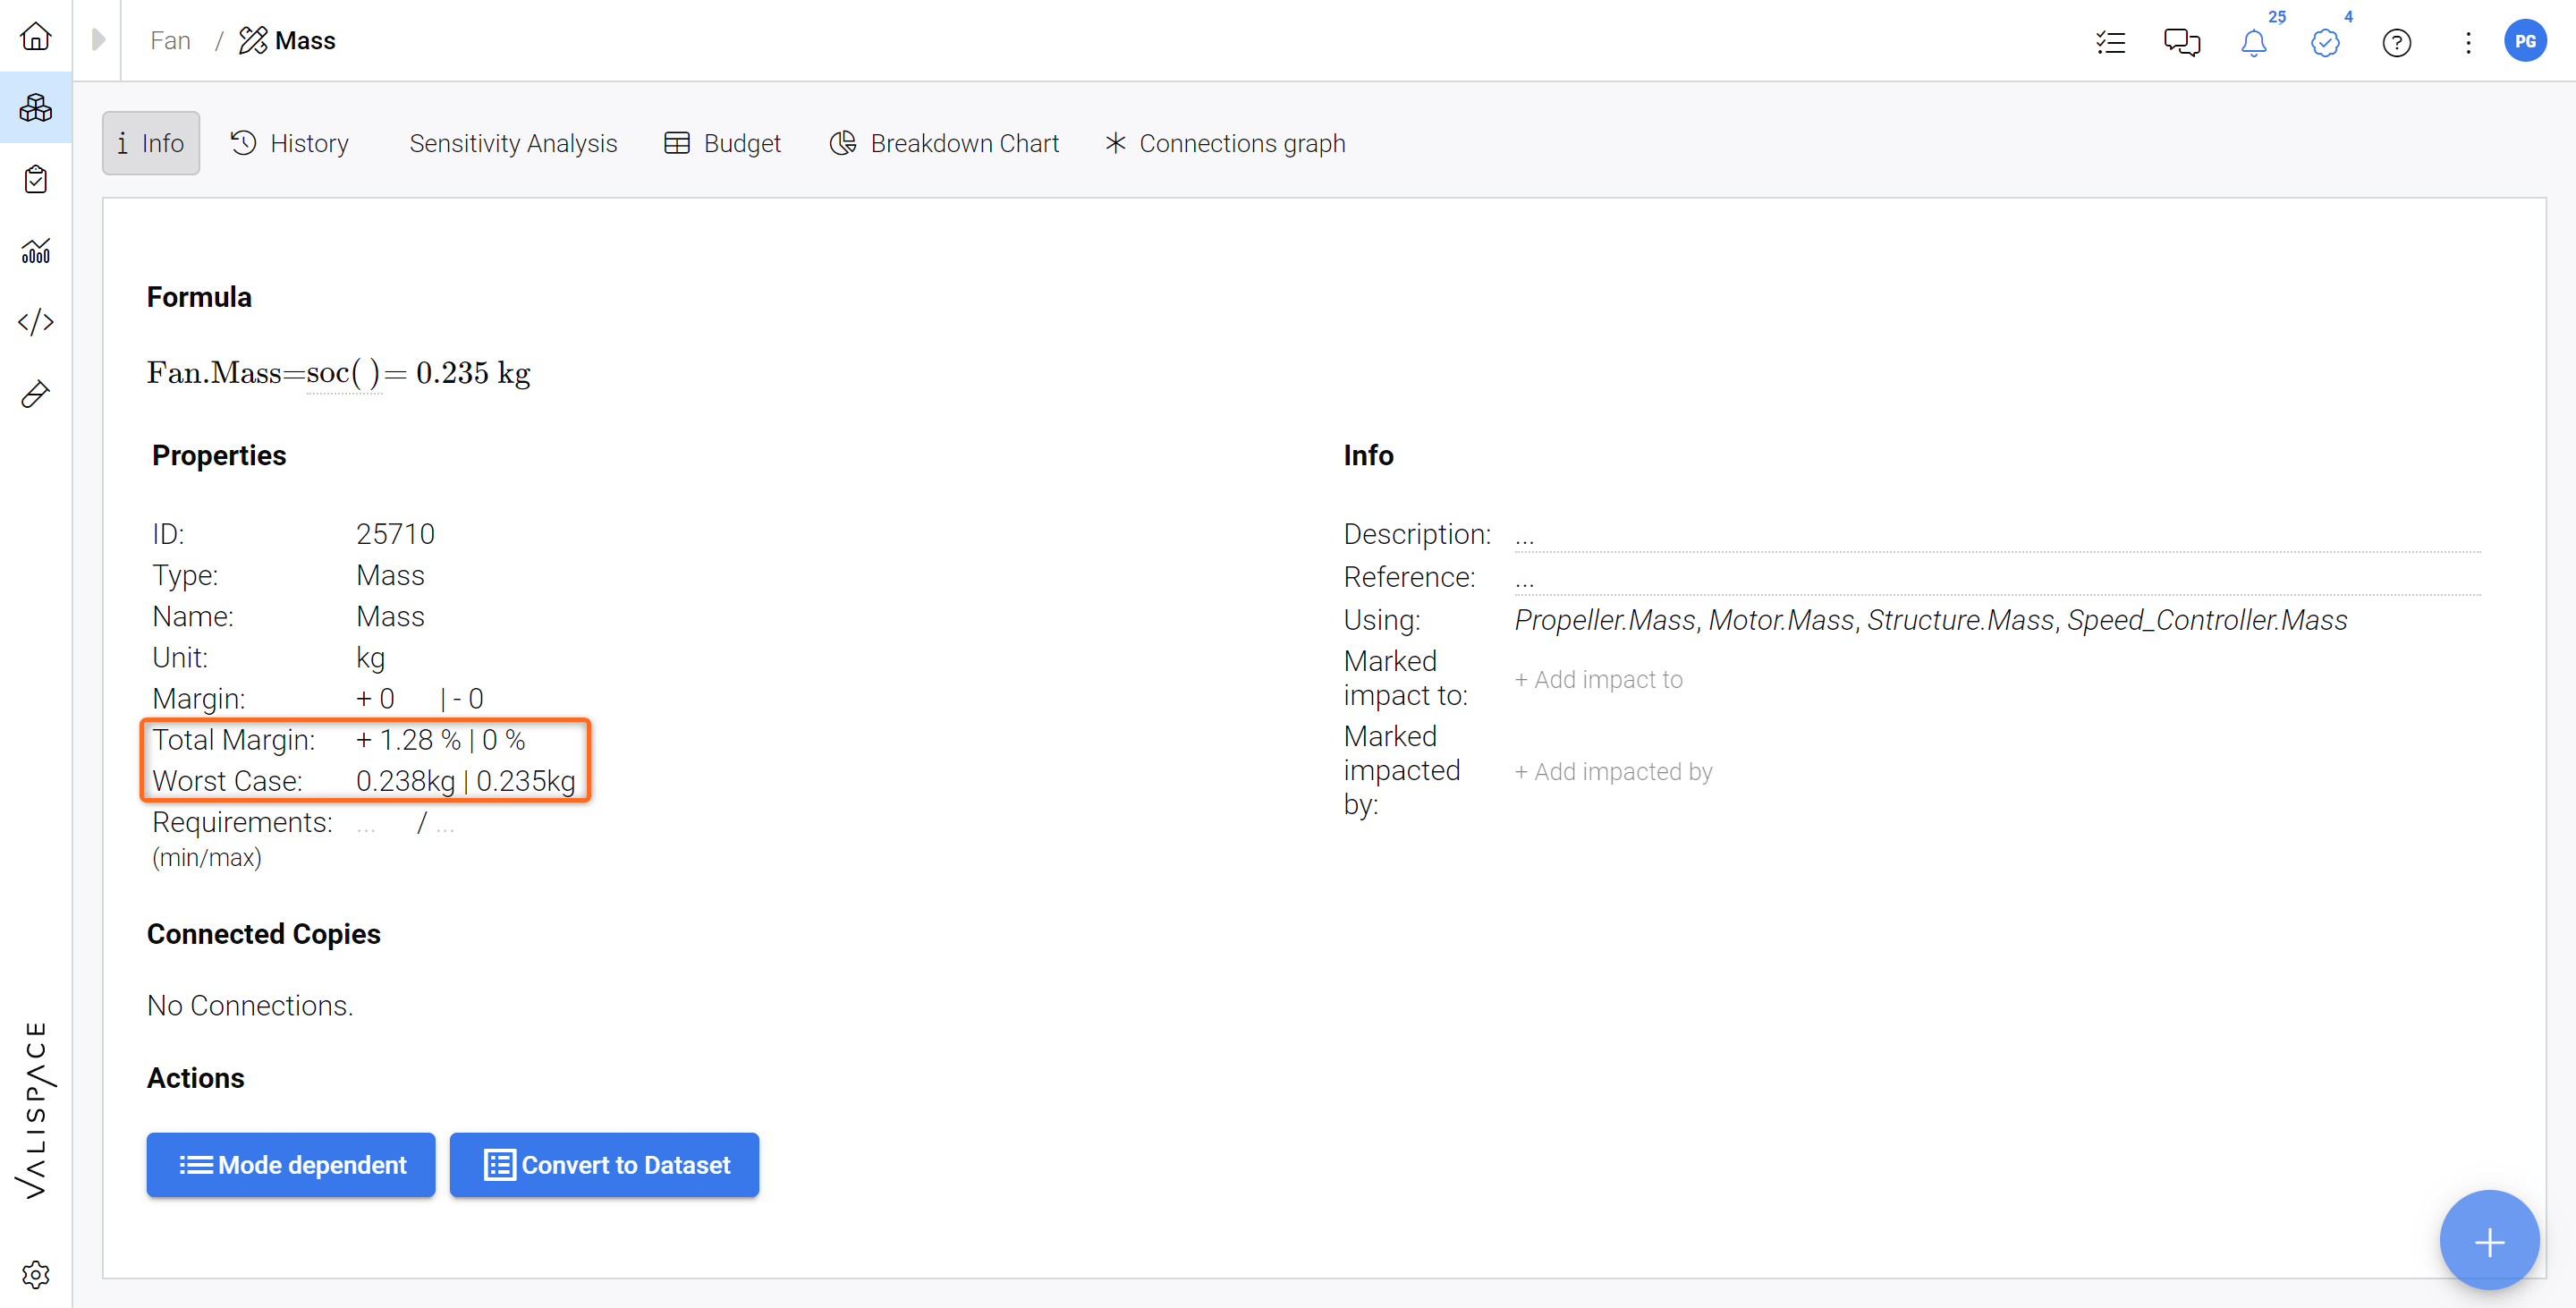
Total Margins and worst case values for the Fan Block - Based on the margin defined on the Propeller Block, the Requirements and Systems Portal automatically updates the margins and worst cases on the higher level.
The next part of the tutorial (Design System - Part 2) will be crucial to establish connections between the Requirements and your System Design. This will also lay the groundwork for any subsequent Validation & Verification Activities later on.
Also, you will see how to display all the Data from the Requirements and System Design Module in the Analysis Module - a place to create your internal Analysis Documentation.