Scripting Module
In the context of this documentation “Valispace“ will be called “Requirements and Systems Portal“.
The Scripting Module integrates Octave and Python engines, allowing users to write and run calculations using either language within the Requirements and Systems Portal. The module is designed to perform complex calculations that are not possible through the standard ValiEngine.
If users wish to manipulate any other objects other than numerical Valis, they must use the the Requirements and Systems Portal Python API. Examples use cases include:
Creating a value and bulk-adding it to multiple Blocks
Making bulk edits to requirement identifiers
Running simulations using Python
Converting units of power values to kW.
Running a custom workflow behaviour based on automated triggers
Scripting Module Flow
To use the module, the user creates a new script, adds inputs/outputs, writes code in .m or .py, and runs the code to get the desired output.

Scripting Module workflow.
Creating a New Script
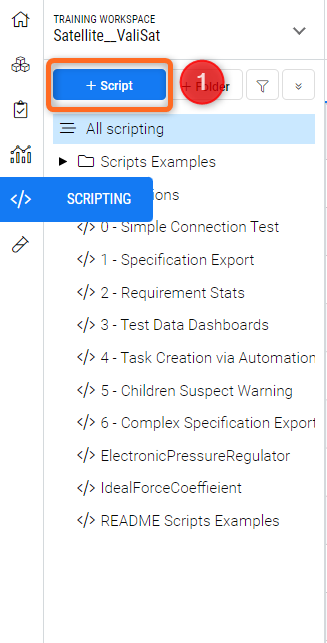
To create a new script, click the "+ Script" (1) option within the scripting modules.
A dialogue box will appear, allowing you to input the script name, select the engine (Octave or Python) and have additional options for the user to use/reuse from the templates.
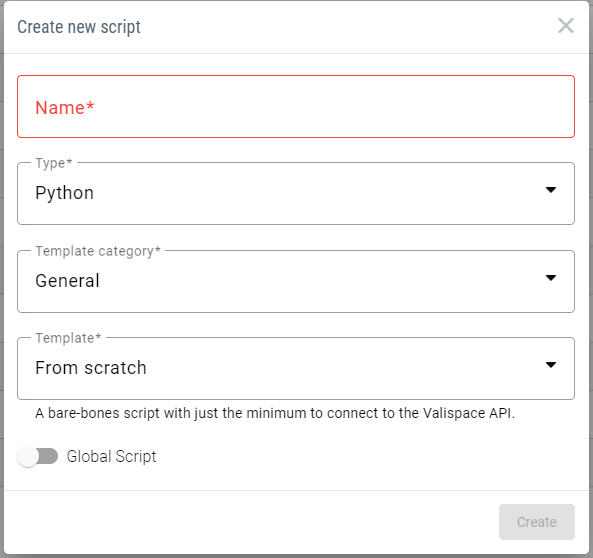
Create New Script Option
The custom actions with in the templates are explained in the separate documentation. You can refer here.
Users also have the possibility to make the script as “Global Script” by toggling the option from the option shown in the Figure Create New Script Option
Once a new script is created, users can also create additional Text, JSON, and YAML files for their scripts. To add a new file, click on the option “+Add file” (1), add a name, and select a file type in the dialog box. This adds a file to the script.

To use any of the extra created files, users must include the following two lines of code at the top of the main.py file:
import site
site.addsitedir('script_code/')
After these two lines, any extra files can be called on using the standard import statement.
Secrets management:
To not expose the use of necessary credentials when using scripts that connect to either our API or that of other tools, it is possible to define personal secret variables that can be called upon script runtime and not risk exposing them to other users on the deployment by storing them in script files.
How and where to add them
Secrets can be defined in the Settings panel under User Secrets. These secrets can be reused within the script to log in to the Requirements and Systems Portal. Here’s a short video to demonstrate how you can create user secrets.
As the name implies, these secrets are unique to each user and only accessible by those who defined them.
How to use Secrets in a script
By importing the secret name from the “.settings” module, users can use secrets for authentication within scripts.
from .settings import USERNAME, PASSWORD  #case sensitive, use the same word used in the user secrets.

LOGIN_DATA = {
    'domain': 'API_URL',
    'username': USERNAME,
    'password': PASSWORD
}
If you are working in the Requirements and Systems Portal on Altium 365 you cannot access the rest API through the Username and Password. You have to use the “User Tokens“ from the the Settings as described here.
On runtime, the scripts will fetch the value for these variables from the secrets defined in the user settings of the user who triggers the script, and they are dependent on that user’s permissions. Scripts should not contain any output functions of these variables in order not to expose user secrets.
General use scripts set to be triggered with automations can be set up with authentication by an Admin level user who can remove read permissions from all other users, thus keeping the script hidden.
Queue system
With the queue system, users can be certain that their scripts will always run, especially if pre-defined automations regularly trigger custom workflow scripts. For this please access the “Runs“ section. You can look at either all of the runs of all the scripts or at the runs of a specific script.
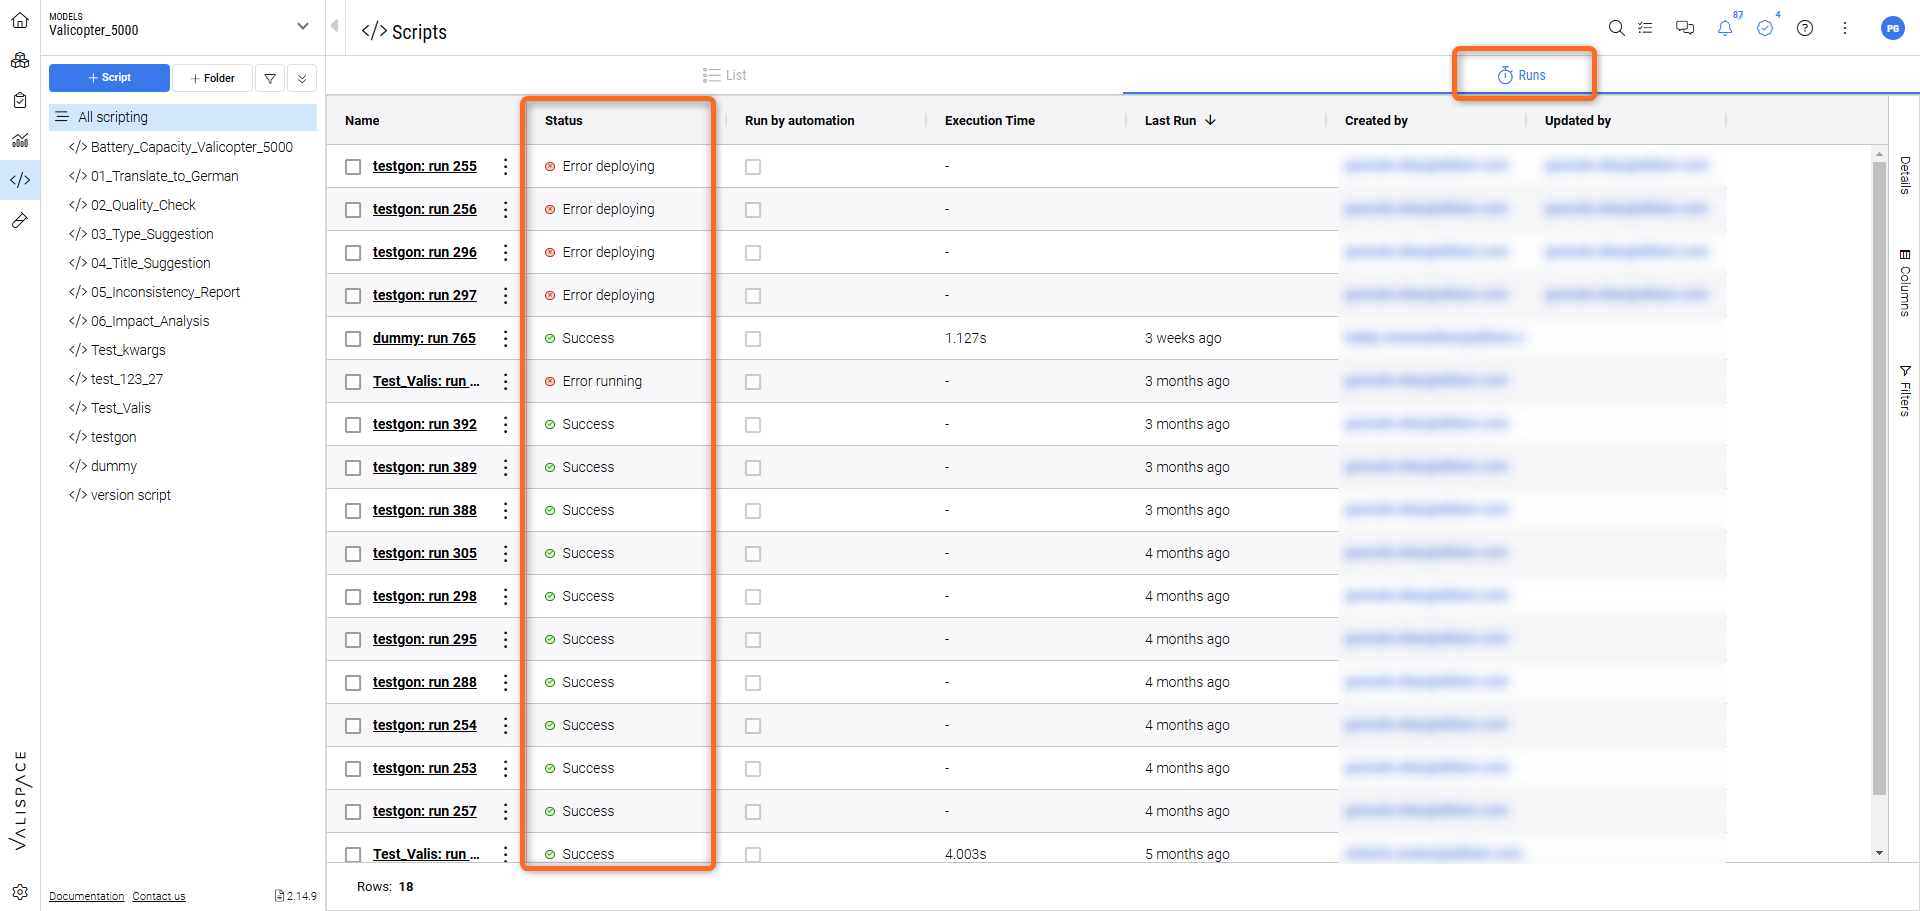
Scripting Queue in action
All script runs will now be saved on the deployment and can be consulted per script or for all scripts by selecting the “All scripting” option at the top of the Script Module tree.
You can stop a running script by clicking the “Stop” button in the Actions dropdown menu.
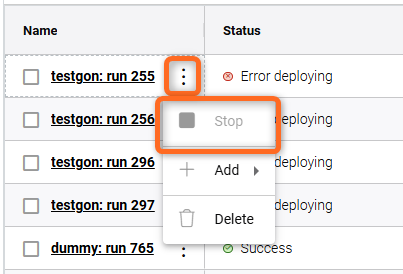
Stop action for a script.
Permissions Handling
Scripts have their own permissions which can be handled either directly from within the Scripting Module or from the Project Module under “Permissions“.
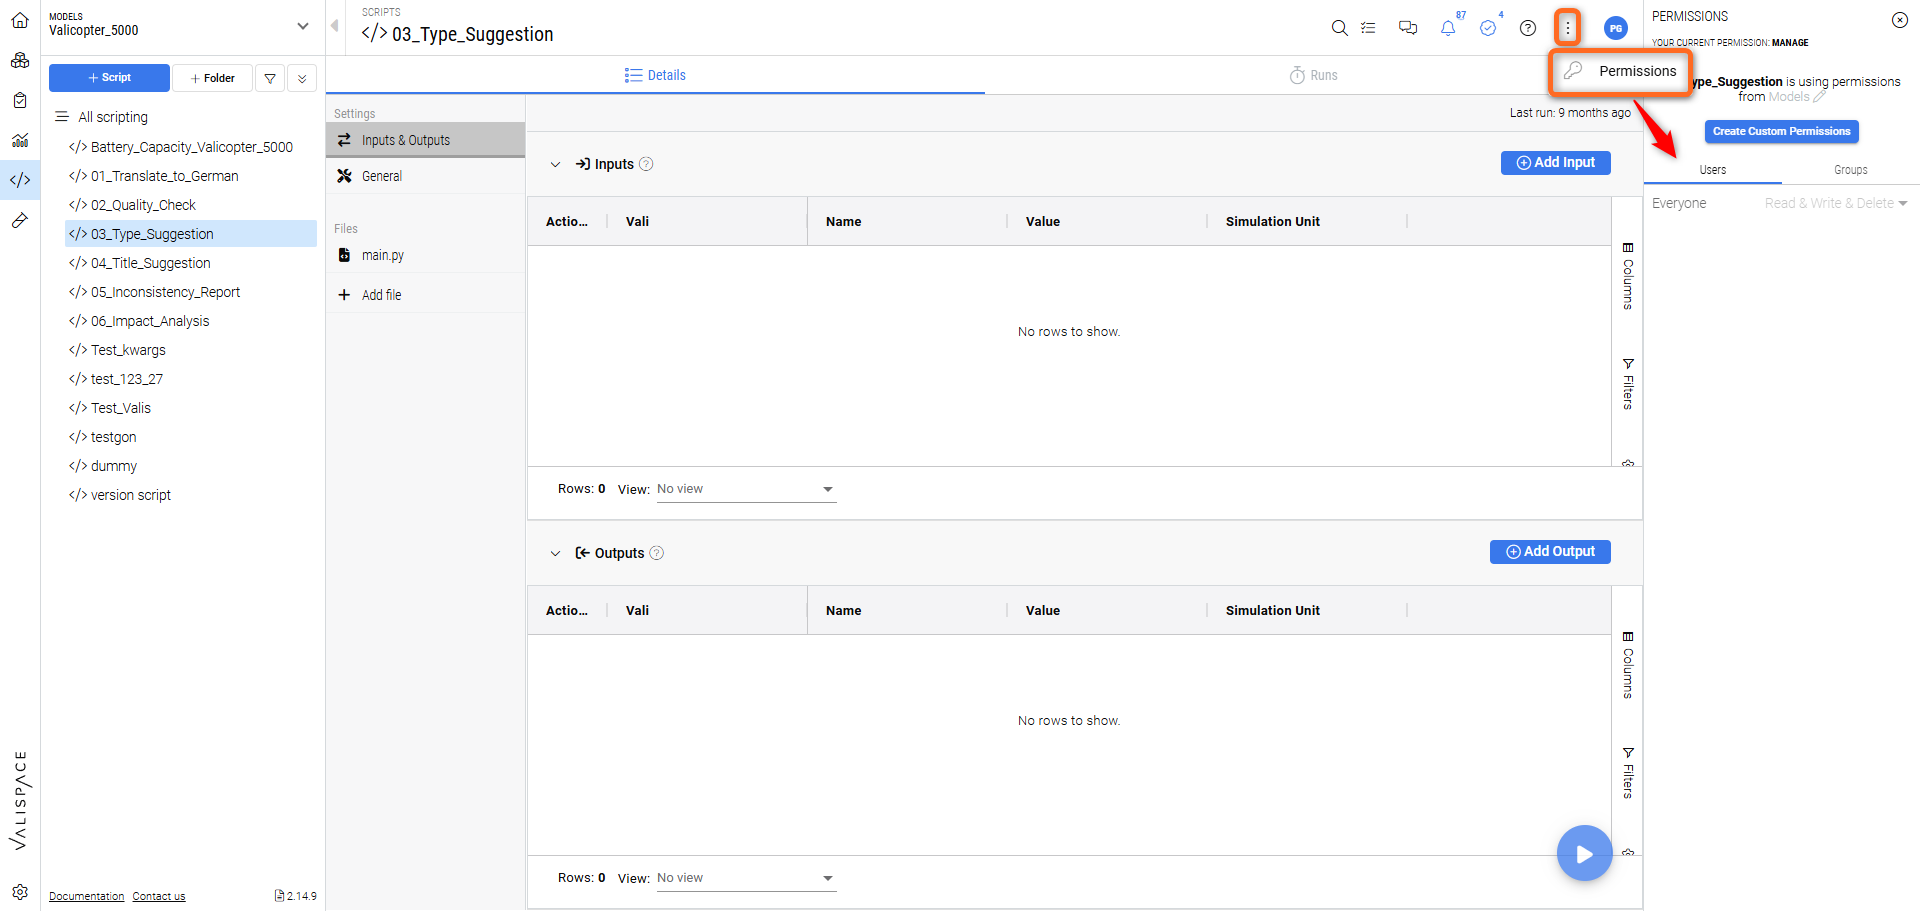
Setting user permissions for a script.
Run scripts from a dashboard
Users can also create custom interaction dashboards with the use of “Run Script” buttons. These are similar to the previously available Request buttons used to trigger REST calls but can be configured to run either single or multiple scripts at the push of a button.
By using the Python API in the called scripts, custom interaction dashboards can be setup in which elements such as standard text boxes can be used as input and output fields for a script, which can then also, directly and indirectly, affect other elements on display.
For this go to the Project Module and into “Dashboards“. Then go into your custom dashboard and click on the Plus icon in the lower right-hand corner. Then select the “Run script“ option from the “Actions“ dropdown.
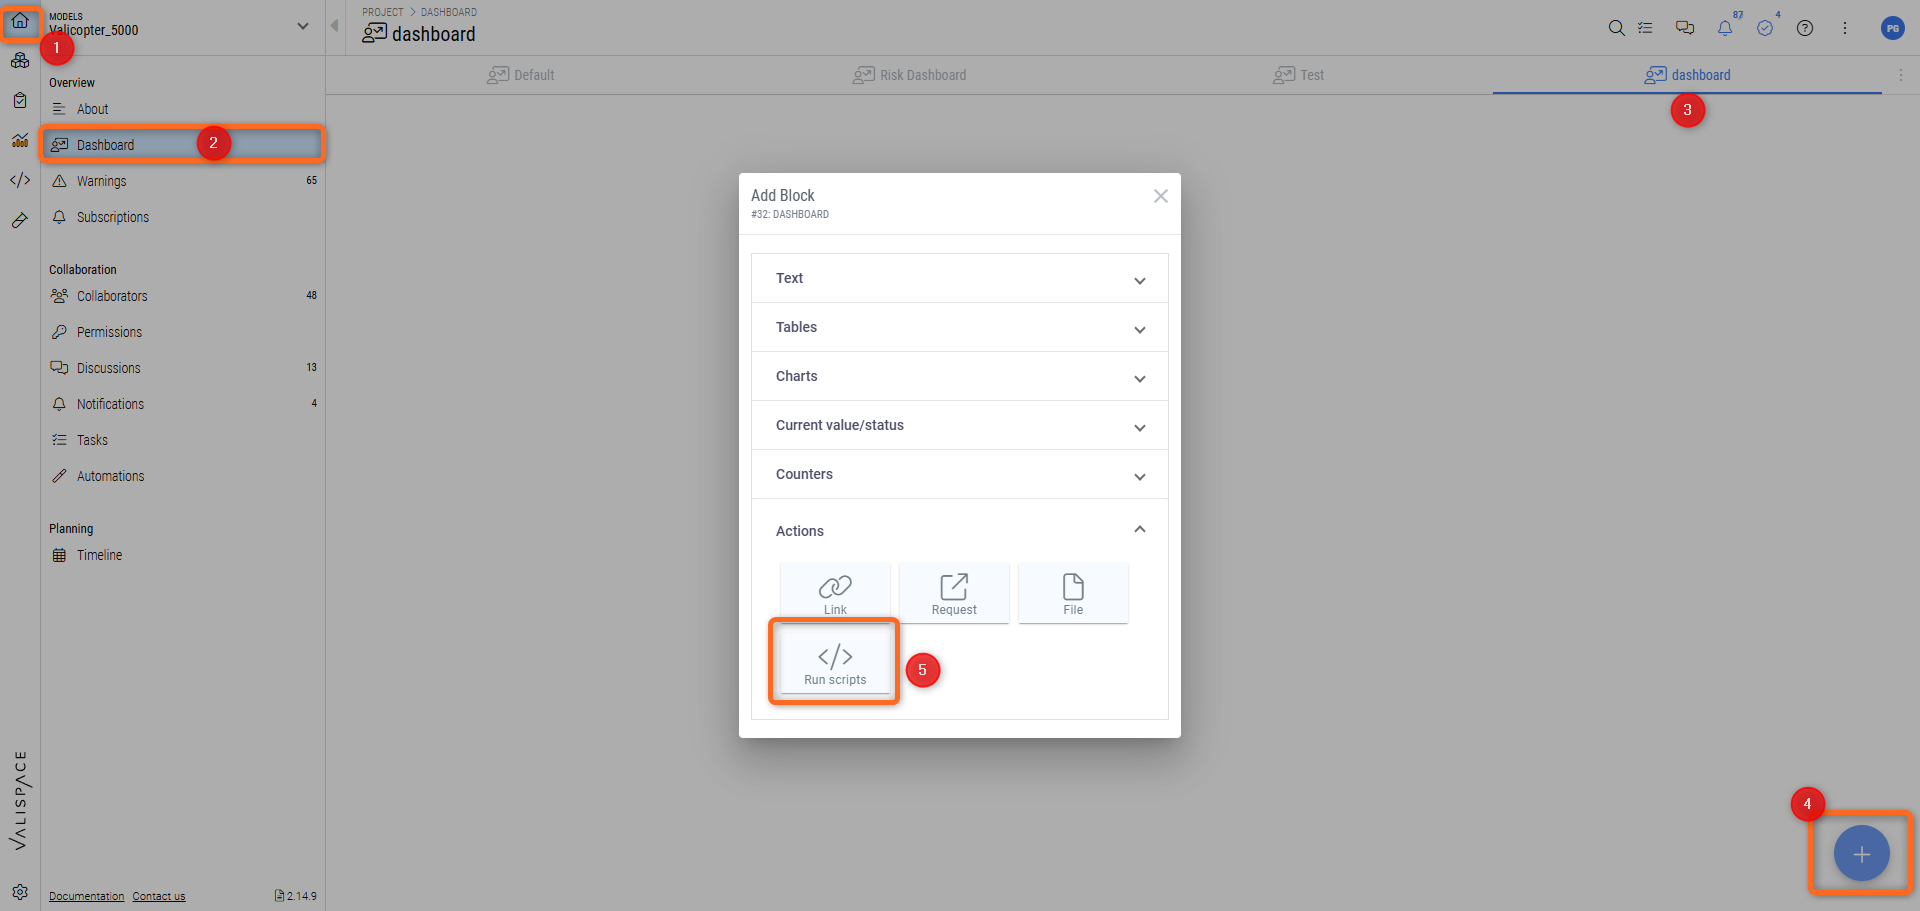
Creating a “Run Scripts” action button in a dashboard.
This creates a button from where you can run scripts that update specific blocks of your dashboard.
An interesting use-case is where passed and failed test runs are counted and displayed in a text block on the same dashboard.
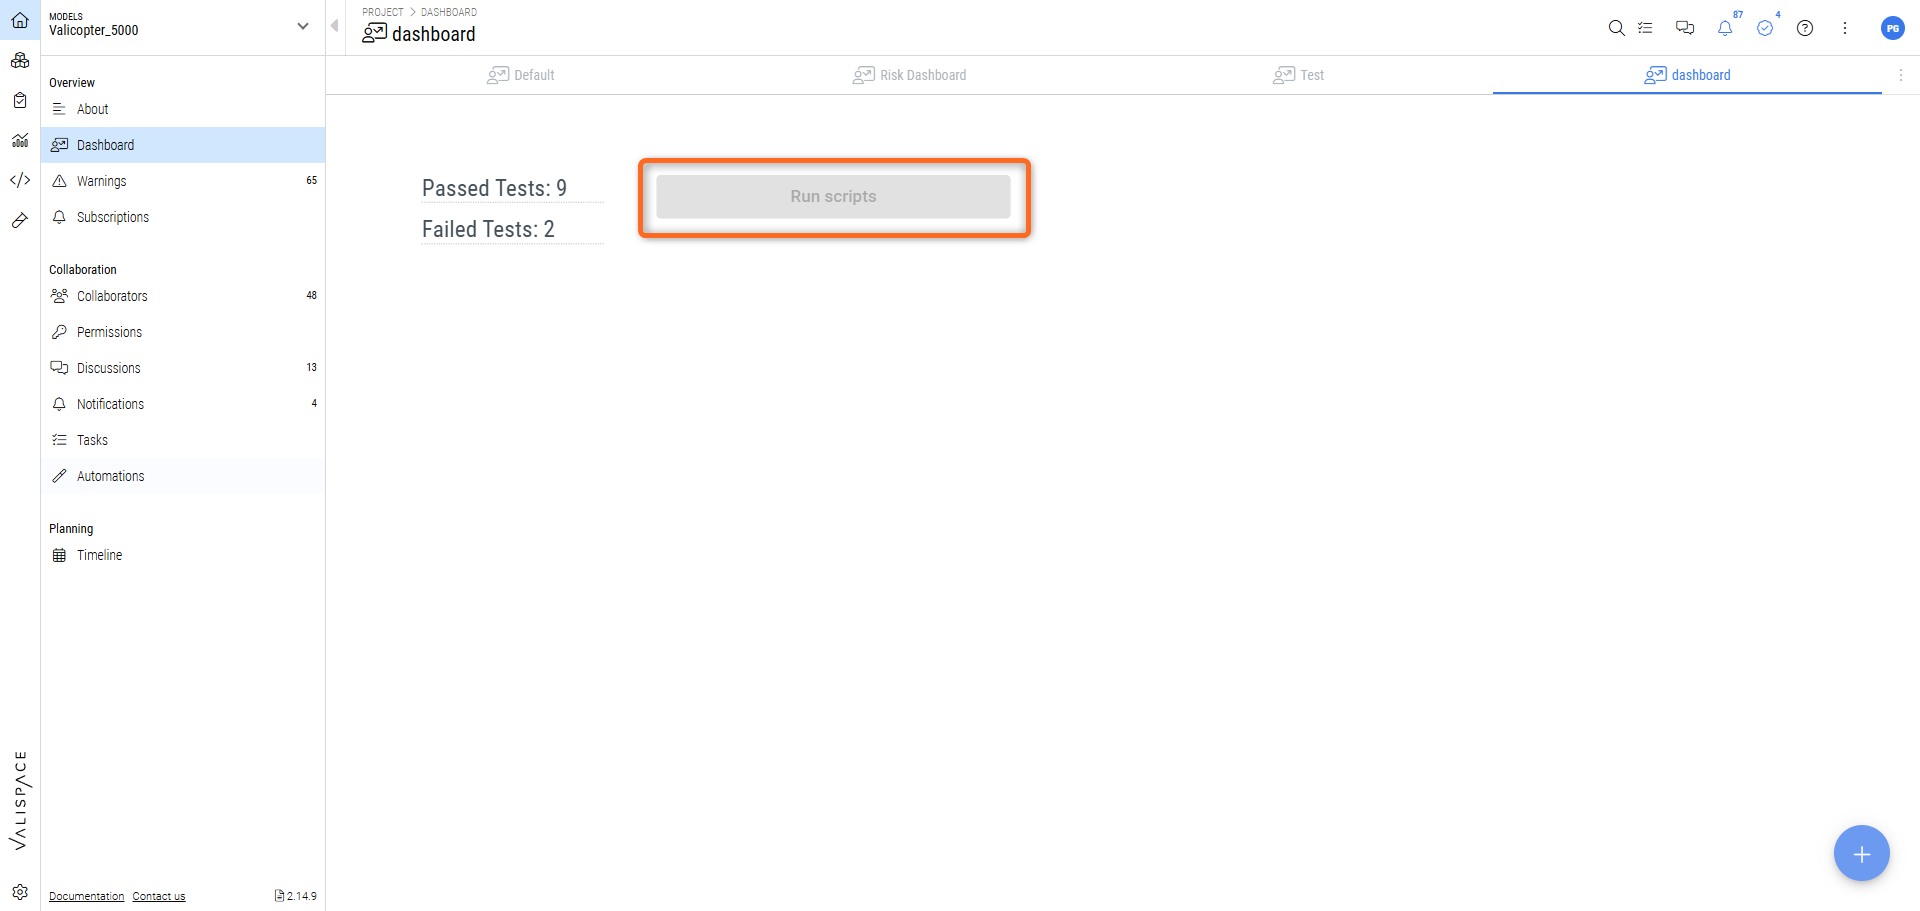
“Run Script“ button in a dashboard to count the status of test runs.
Script & Automations
Pre-set automations can trigger scripts. For example, a complex calculation can be set to run automatically if its defined inputs are altered. Additionally, by using the Requirements and Systems Portal's Python API, bespoke complex behaviour can also be programmed to build custom workflows.
Not only will automations trigger scripts, but they will also pass on the information of which objects triggered them so that scripts can act directly on those objects. The object information is made available in the “kwargs” dictionary variable, under the ‘triggered_objects' key, as in the following example:
object_data = kwargs['triggered_objects'][0]Automations will also run scripts if triggered by users who do not have permissions to view said scripts, thus allowing for workflow customization and calculations by admin users while limiting access to underlying code, such as proprietary mathematical and physical models.
Example workflow scripts can be found in the valifn public repository’s templates folder.
Custom Valifn images
On-prem users have the added feature of customizing their valifn instance to run any Python package they want, provided their server hardware can handle it. On-prem users will also have the ability to manage which valifn image is to be used on script run time.
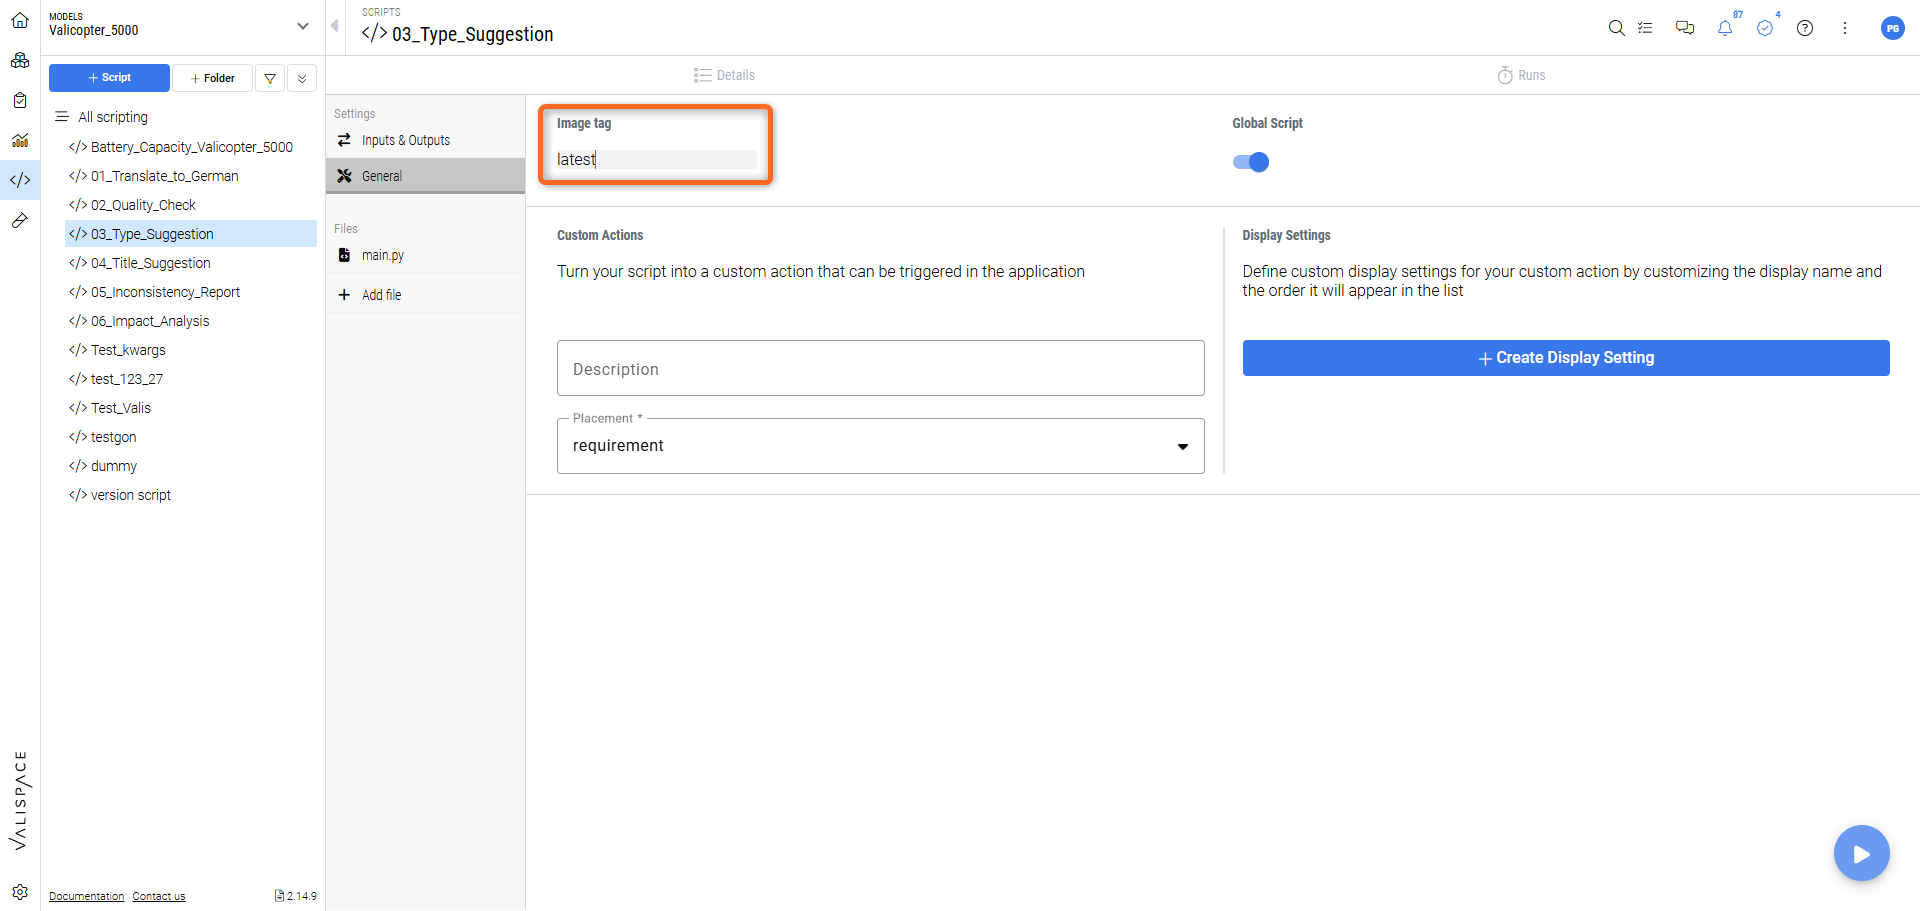
Setting which valifn image to use on a script in an on-prem deployment.
As shown, this option is available as a text field in the General Settings for each individual script.
How to create a custom image
Further instructions on how to set up your own valifn images can be found in the public repository’s documentation pages:
Python Script Examples
Usable script examples can be found both in a deployment’s Valicopter 5000 (new deployments) example project and in ValiFn’s Github public repository.
These examples can be triggered manually or by automations (exclusively in some cases) and can be either used as is or modified by users to perform any sort of bespoke behaviour.
Many of these examples were created as demonstrations of the possibilities of the scripting module and automations to create bespoke automated workflows. Users are encouraged to customize any existing script to their needs and to share any general purpose scripts and improvements to ValiFn’s public repository.
Children Suspect Warning (Automation)
Rational
This script is triggered by an automation which must be set to be triggered by a change to an existing requirement as the script acts on the properties of the edited requirement. Its currently defined action is to place a discussion in every of it’s children (if it has any) with a bespoke message regarding the change status of the parent requirement.
Suggested Customization
Other possible actions could be to create a task or add the edited requirement to a review.
Current Actions
Checks whether requirement that triggered pre-set automation has children
If it has children it posts a discussion in each child requirement indicating that the parent has been updated.
The discussion includes the identity of the user who edited the requirement, thus triggering the automation.
New Task (Automation)
Rational
When creating new Block a prospect required that tasks would automatically be created and assigned to a specific user. In this example a pre-set automation triggered by the creation of a new Block will create a new task and assign a user to it. It was idealized to add the triggering object as an input but that development wasn’t finalized.
Suggested Customization
Use the kwargs['triggered_objects'][0] to extract the information of the object which triggered the automation and add it to the task’s input field.
Current Actions
Posts a new task assigned to a specified user.
Requirement Stats
Rational
A simple example of how a more customized counter can be created with more statistical values than the ones supplied in the default blocks available in Dashboards and Analysis documents. It can be run manually or set to run from an automation every time a requirement is created, modified or deleted.
Suggested Customizations
Take the extracted information on requirements and derive more complex statistics from it by comparing it with previously updated values. Each value can indicate how much it increased/decreased expressed in percentage.
Compare deployment statistics by individually running the script in each project and adding a special instance which draws statistics from every project, displaying them in a dashboard.
Set a customized warning for project administrators if the statistics show a sudden drop in number of requirements, signalling a possible drastic change to the project.
Current Actions
Builds overall requirement stats for a single project on the deployment.
Patches pre-created Valis with results.
Specification Generation
Rational
An example script which demonstrates the power of the Python API to create fully automated reports. Although the main script is also available in the integrations documentations page this particular version has been adapted to run from the deployment’s scripting module.
It can be triggered by an automation or manually.
Suggested Customizations
Create a full report by adapting the current requirements fetching process to extract Blocks and other objects to be filled out in the report
Add other customizable fields, which can be fetched from a custom dashboard text blocks, from which it can also be triggered.
Change the final output file to a PDF instead of an editable Word file.
Current Actions
Takes a Word file as a Template, from a given deployment, and returns, as an output, generated files, as many as there are specifications, placed in the deployment's Files Management (see Specification export based on Microsoft Word Template for more details).
Test Dashboard
Rational
Dashboard counters have not yet caught up with the Testing module, and there are not automated counters for tests yet. This script was developed as a proof of concept for a custom counter has not yet been implemented. It was initially conceived to run from a manual triggering from a Run Script button in a Dashboard.
Suggested Customizations
Expand the Test statistics which are posted back to Dashboards.
If a test run is successful, post the result to a connected task and change its state to “Done”.
Current Actions
Returns a string, placed on predefined Dashboard text blocks, with calculated test run statistics.
It can take input from an automation or it can be triggered manually.
.png)